Filbert Gateau with Praline Buttercream - Daring Bakers

Time for the Daring Bakers Challenge again. Another finger licking good dessert, the best I've eaten yet!

Filbert Gateau with Praline Buttercream
From Great Cakes by Carol Walter

1 Filbert Gateau
1 recipe sugar syrup, flavored with dark rum
1 recipe Praline Buttercream
½ cup heavy cream, whipped to soft peaks
1 recipe Raspberry Glaze
1 recipe Ganache Glaze, prepared just before using
3 tablespoons filberts, toasted and coarsely chopped


Filbert Gateau

Because of the amount of nuts in the recipe, this preparation is different from a classic genoise.

1 ½ cups hazelnuts, toasted/skinned
2/3 cup cake flour, unsifted
2 Tbsp. cornstarch
7 large egg yolks
1 cup sugar, divided ¼ & ¾ cups
1 tsp. vanilla extract
½ tsp. grated lemon rind
5 lg. egg whites
¼ cup warm, clarified butter (100 – 110 degrees)

Position rack in the lower 3rd of the oven and preheat to 350 degrees. Grease and flour a 10”x 2” inch round cake pan. (I used two 6x2 pans)

Using a food processor, process nuts, cake flour, and cornstarch for about 30 seconds. Then, pulse the mixture about 10 times to get a fine, powdery mixture. You’ll know the nuts are ready when they begin to gather together around the sides of the bowl. While you want to make sure there aren’t any large pieces, don’t over-process. Set aside.

Put the yolks in the bowl of an electric mixer, with the whisk attachment, and beat until thick and light in color, about 3-4 minutes on med-high speed. Slowly, add ¾ cup of sugar. It is best to do so by adding a tablespoon at a time, taking about 3 minutes for this step. When finished, the mixture should be ribbony. Blend in the vanilla and grated lemon rind. Remove and set aside.

Place egg whites in a large, clean bowl of the electric mixer with the whisk attachment and beat on medium speed, until soft peaks. Increase to med-high speed and slowly add the remaining ¼ cup of sugar, over 15-20 seconds or so. Continue to beat for another ½ minute.
Add the yolk mixture to the whites and whisk for 1 minute.

Pour the warm butter in a liquid measure cup (or a spouted container). * It must be a deep bottom bowl and work must be fast.* Put the nut meal in a mesh strainer (or use your hand – working quickly) and sprinkle it in about 2 tablespoons at a time – folding it carefully for about 40 folds. Be sure to exclude any large chunks/pieces of nuts. Again, work quickly and carefully as to not deflate the mixture. When all but about 2 Tbsp. of nut meal remain, quickly and steadily pour the warm butter over the batter. Then, with the remaining nut meal, fold the batter to incorporate, about 13 or so folds.

With a rubber spatula, transfer the batter into the prepared pan, smoothing the surface with the spatula or back of a spoon. **If collected butter remains at the bottom of the bowl, do not add it to the batter! It will impede the cake rising while baking.

Tap the pan on the counter to remove air bubbles and bake in the preheated oven for 30-35 minutes. You’ll know the cake is done when it is springy to the touch and it separates itself from the side of the pan. Remove from oven and allow to stand for 5 minutes. Invert onto a cake rack sprayed with nonstick coating, removing the pan. Cool the cake completely.

*If not using the cake right away, wrap thoroughly in plastic wrap, then in a plastic bag, then in the refrigerator for up to 3 days. If freezing, wrap in foil, then the bag and use within 2-3 months.


Sugar Syrup
Makes 1 cup, good for one 10-inch cake – split into 3 layers

1 cup water
¼ cup sugar
2 Tbsp. dark rum or orange flavored liqueur

In a small, yet heavy saucepan, bring the water and sugar to a boil and simmer for 5 minutes. Remove from heat, add the liqueur. Cool slightly before using on the cake. *Can be made in advance.


Praline Buttercream
1 recipe Swiss Buttercream
1/3 cup praline paste
1 ½ - 2 Tbsp. Jamaican rum (optional)

Blend ½ cup buttercream into the paste, then add to the remaining buttercream. Whip briefly on med-low speed to combine. Blend in rum.

Swiss Buttercream
4 lg. egg whites
¾ cup sugar
1 ½ cups (3 sticks) unsalted butter, slightly firm
1 ½ -2 Tbsp. Grand Marnier or liqueur of your choice
1 tsp. vanilla

Place the egg whites in a lg/ bowl of a elevtric mixer and beat with the whisk attachment until the whites are foamy and they begin to thicken (just before the soft peak stage). Set the bowl over a saucepan filled with about 2 inches of simmering water, making sure the bowl is not touching the water. Then, whisk in the sugar by adding 1-2 tablespoon of sugar at a time over a minutes time. Continue beating 2-3 minutes or until the whites are warm (about 120 degrees) and the sugar is dissolved. The mixture should look thick and like whipped marshmallows.
Remove from pan and with either the paddle or whisk attachment, beat the egg whites and sugar on med-high until its a thick, cool meringue – about 5-7 minutes. *Do not over beat*. Set aside.

Place the butter in a separate clean mixing bowl and, using the paddle attachment, cream the butter at medium speed for 40-60 seconds, or until smooth and creamy. *Do not over beat or the butter will become too soft.*

On med-low speed, blend the meringue into the butter, about 1-2 Tbsp. at a time, over 1 minute. Add the liqueur and vanilla and mix for 30-45 seconds longer, until thick and creamy.

Refrigerate 10-15 minutes before using.

Refrigerate in an airtight container for up to 5 days, or can be frozen for up to 6 months. If freezing, store in 2 16-oz. plastic containers and thaw in the refrigerator overnight or at room temperature for several hours.

Praline Paste
1 cup (4 ½ oz.) Hazelnuts, toasted/skinless
2/3 cup Sugar
Line a jelly roll pan with parchment and lightly butter.

Put the sugar in a heavy 10-inch skillet. Heat on low flame for about 10-20 min until the sugar melts around the edges. Do not stir the sugar. Swirl the pan if necessary to prevent the melted sugar from burning. Brush the sides of the pan with water to remove sugar crystals. If the sugar in the center does not melt, stir briefly. When the sugar is completely melted and caramel in color, remove from heat. Stir in the nuts with a wooden spoon and separate the clusters. Return to low heat and stir to coat the nuts on all sides. Cook until the mixture starts to bubble. **Remember – extremely hot mixture.** Then onto the parchment lined sheet and spread as evenly as possible. As it cools, it will harden into brittle. Break the candied nuts into pieces and place them in the food processor. Pulse into a medium-fine crunch or process until the brittle turns into a powder. To make paste, process for several minutes. Store in an airtight container and store in a cook dry place. Do not refrigerate.

Raspberry Glaze
Good for one 10-inch cake

2/3 cup thick raspberry preserves
1 Tbsp. water

In a small, yet heavy saucepan, bring the water and preserves to a slow boil and simmer for 2-3 minutes. If the mixture begins to stick to the bottom of the saucepan, add water as needed.

Remove from heat and, using a strainer, press the mixture through the mesh and discard any remnants. With a pastry brush, apply the glaze onto the cake while the cake is still warm. If the glaze is too thick, thin to a preferred consistency with drops of water.

Ganache Glaze
Makes about 1 cup, enough to cover the top and sides of a 9 or 10 inch layer or tube cake

**Ganache can take on many forms. While warm – great fudge sauce. While cool or lukewarm – semisweet glaze. Slightly chilled – can be whipped into a filling/frosting. Cold & solid – the base of candied chocolate truffles.

6 oz. (good) semisweet or bittersweet chocolate, like Lindt
6 oz. (¾ cup heavy cream
1 tbsp. light corn syrup
1 Tbsp. Grand Marnier, Cointreay, or dark Jamaican rum (optional)
¾ tsp. vanilla
½ - 1 tsp. hot water, if needed

Blend vanilla and liqueur/rum together and set aside.

Break the chocolate into 1-inch pieces and place in the basket of a food processor and pulse until finely chopped. Transfer into a medium sized bowl and set aside.

Heat the cream and corn syrup in a saucepan, on low, until it reached a gentle boil. Once to the gently boil, immediately and carefully pour over the chocolate. Leave it alone for one minute, then slowly stir and mix the chocolate and cream together until the chocolate is melted and incorporated into the cream. Carefully blend in vanilla mixture. If the surface seems oily, add ½ - 1 tsp hot water. The glaze will thicken, but should still be pourable. If it doesn’t thicken, refrigerate for about 5 minutes, but make sure it doesn’t get too cold!


Assembling Cake

Cut a cardboard disk slightly smaller than the cake. Divide the cake into 3 layers and place the first layer top-side down on the disk. Using a pastry brush, moisten the layer with 3-4 Tbsp. of warm sugar syrup. Measure out 1 cup of praline buttercream and set aside.

Spread the bottom layer with a ¼-inch thickness of the remaining buttercream. Cover with ½ of the whipped cream, leaving ¼-inch border around the edge of the cake. Place the middle layer over the first, brush with sugar syrup, spreading with buttercream. Cover with the remaining whipped cream.

Moisten the cut side of the third layer with additional sugar syrup and place cut side down on the cake. Gently, press the sides of the cake to align the layers. Refrigerate to chill for at least 30 minutes.

Lift the cake by sliding your palm under the cardboard. Holding a serrated or very sharp night with an 8-ich blade held parallel to the sides of the cake, trim the sides so that they are perfectly straight. Cut a slight bevel at the top to help the glaze drip over the edge. Brush the top and sides of the cake with warm apricot glaze, sealing the cut areas completely. Chill while you prepare the ganache.

Place a rack over a large shallow pan to catch the ganache drippings. Remove the gateau from the refrigerator and put it the rack. With a metal spatula in hand, and holding the saucepan about 10 inches above the cake, pour the ganache onto the cake’s center. Move the spatula over the top of the ganache about 4 times to get a smooth and mirror-like appearance. The ganache should cover the top and run down the sides of the cake. When the ganache has been poured and is coating the cake, lift one side of the rack and bang it once on the counter to help spread the ganache evenly and break any air bubbles. (Work fast before setting starts.) Patch any bare spots on the sides with a smaller spatula, but do not touch the top after the “bang”. Let the cake stand at least 15 minutes to set after glazing.

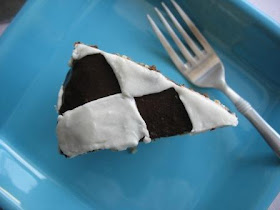
You can decorate the cake any way you like using the praline buttercream. The chocolate ganache and the white buttercream suggested chequers to me and so that's what I did.

Leftover cake can be covered with foil and kept in the refrigerator for up to 5 days.

Absolutely delicious and perfect for any nut lover. I had never eaten a Hazelnut cake a.k.a. Filbert Gateau before and this just did it for me.

Thanks to Chris of Mele Cotte for this wonderful challenge.

Karibevu Pudi --Curry Leaves Powder

Karibevu is Kannada for Curry Leaves and Pudi translates to Powder. Pudis and Pickles have always been an important part of our meals since childhood for several reasons. One, because granny made varieties of pudis and pickles all the time and another all of our summers spent at granny’s place ensured we ate them at almost every meal.

More than pickles, ajji makes various pudis (better known to some as chutney pudi) with curry leaves, fried gram (Dalia), dried coconut, groundnuts,cumin and the list goes on. Our favourite is the Poppindi, made with fried gram (dalia). Next, is the one made with curry leaves. These pudis were eaten with everything from idlis,dosas and everything in between….even bread toasted on a tava with ghee. Mmmm, the perfect combo! Often meals started with Pudi anna - mixture of rice, any one of the pudis, and a little bit of ghee.

I bought a big pack of the curry leaves a couple of days ago and I knew I wouldn’t be using all of it in cooking. So I made the curry leaves powder – Karibevu pudi, using ajji’s recipe from her cookbook.

You will need: (Makes about 1 ½ cups of Pudi)

4 cups packed, fresh curry leaves
¾ Cup dry grated coconut
8 Dry red chillies
2 Tbsp Urad Dal
1 ½ tbsp Cumin seeds
1 tbsp plus 1 tsp Powdered Jaggery
1 tsp Tamarind (remove seeds and fibres)
½ tsp Mustard seeds
¼ tsp Asafoetida
Salt to taste

Wash and dry the curry leaves. Dry roast them in a hot non stick pan till they are crisp and crumbly to the touch. Turn off heat and let cool.

Meanwhile dry roast each separately the urad dal, cumin seeds, dry red chillies and the dry coconut. Grind these to a fine powder.

Powder the roasted cooled curry leaves. Combine this with the other powder and blend one last time with tamarind, jaggery and salt.

In a pan, heat ½ tsp oil. Add mustard seeds and asafetida. When the seeds splutter, add the powder and sauté till fragrant and slightly changes colour. About 6-7 minutes.

Let cool completely before storing in an air tight jar.

Basil Walnut Pesto with Gemilli Pasta

Fresh basil always makes me high…high on the intense delicious flavour, which makes me crave for more and more of it. I’ve used fresh Basil in a number of dishes before and simply can't get enough of it!

I got my first taste of Basil Pesto, when I had the Mediterranean Pizza at Scholtzky’s Deli. I thoroughly enjoyed the pesto sauce on the base and while biting into the pizza, I was making a strong mental note to find a recipe for pesto and make it asap!

So the next trip to the Farmers Market, I came back with fresh Basil. I began to look for recipes and most of them I came across called for Pine Nuts, which are pretty expensive for a small quantity. I decided to substitute it with Walnuts instead, since I had a big bag of walnuts in their shells. Basil Pesto was ready in no time!

Gemelli with Basil Walnut Pesto:

Gemelli is a dry pasta which is spiral shaped. The different shapes of pasta always fascinate me and every time I run out of pasta (yes, it happens every now and then :-D) I buy a new shape to try, just for the fun of it :) So this time it was these spiral shaped beauties.

You will need:

1 Cup Gemelli pasta
¼ Cup Basil Walnut pesto (recipe below)
Salt to taste

Boil Gemelli in a pot of salted water, till done. Drain and toss with pesto. Add salt if required. Serve hot. Additional parmesan maybe added on top before serving.

Basil Walnut Pesto:

You will need:

2 Cups packed, Fresh Basil leaves
½ Cup Walnuts, chopped
¾ Cup Grated Parmesan Cheese
Olive Oil as required
2 cloves of Garlic, chopped

In a blender or a food processor, add chopped walnuts and pulse to break the walnuts into smaller finer bits. Now add the garlic and the basil leaves. Blend to combine. Now slowly stream in the olive oil and blend, this loosens the mixture and helps it blend smoothly. Add oil till the mixture has a paste like consistency. Transfer to a bowl, stir in the parmesan cheese. The cheese is salty so taste the pesto before adding more salt.

To store: Transfer the pesto to a clean jar, cover with a thin layer of olive oil and refrigerate if using in a few days, otherwise freeze it. Thaw before using. If frozen, it should last for 2-3 months.

Pesto can be used as a dip, tossed with pasta or even used a pizza sauce. My love for pasta is not unknown, so that is what I used the pesto for.

Gemilli with Basil Walnut Pesto is my entry to A.W.E.D Italian hosted by Dhivya at Culinary Bazaar and also to Herb Mania:Basil hosted by Dee of Ammalu's Kitchen.

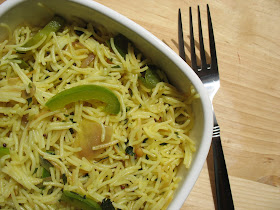
Shavige Uppittu (Vermicelli Upma)

Quick and easy to whip up, this dish is good for breakfast, lunch or dinner :)

You will need:

1 Cup Vermicelli (Bambino/MTR brand)
3 tsp Oil
1 tsp Mustard seeds
1 tsp Urad Dal
1 tsp Chana Dal
½ tsp Turmeric Powder
4 Green chillies, slit
Few curry leaves
1 Onion, thinly sliced
1 Green Bell pepper, thinly sliced
1 tsp Lemon juice
Chopped corriander
Salt to taste

Set a pot of water to boil.

Heat one tsp of oil in a pan. Add the vermicelli and sauté for a couple of minutes till light brown. Turn off heat and add this to the boiling water. Cook vermicelli for 6-8 minutes till transparent and cooked through. Drain and reserve.

Heat remaining oil in a pan. Add the mustard seeds, urad and chana dals. Saute till mustard splutters. Add the green chillies and curry leaves, sauté for a few seconds and add the sliced onions and bell peppers. Saute till onions are soft and bell peppers are cooked through. Now add the turmeric powder and sauté for a minute more. Add the drained vermicelli and combine. Season with salt, add the lemon juice and garnish with chopped coriander. Serve immediately.

The fresh lemon juice and corriander add a burst of flavour to every bite.

Dal Maakhani and Jeera Rice

Dal Maakhani and Jeera Rice are the ultimate pair of dishes when it comes to good eating. The creamy lentil curry paired with the mildly flavoured fragrant rice, its a match made in Food Heaven :-D


I had been meaning to make Dal Maakhani at home for a long time, but never got down to doing it because I would always forget to buy the Black Dal at the Indian store. A couple of weeks ago, while chatting with my cousin, Dal Maakhani found its way into the conversation, and I was soon reading up on Sanjeev Kapoor's recipe for the dish. I could have got the recipe of his website but I guess that would have never happened without a nudge from external forces...hehe! Thanks to my cousin :)

Dal Maakhani


You will need:

1 cup Black dal (Whole Urad Dal)
2 tbsp Rajma (Red kidney beans)
1 large Onion, chopped
1 large Tomato, chopped
1" pc Ginger finely chopped
4 Cloves of Garlic, chopped
1/4 tsp Garam Masala powder
1 tsp Chilli powder
2 Green Chillies, slit
3 tbsp Butter
2 tsp Oil
Salt to taste

Soak both dals over night. Pressure cook the dals with salt and little chilly powder for three whistles and cook on low heat for 40 minutes.
Heat oil and butter in a thick bottomed vessel. On medium high heat add cumin seeds, when they splutter add ginger, garlic and green chillies.After a minute add onions and saute till done. Now add the chopped tomato, chilly powder, garam masala and salt. Also add the cooked dals. Bring to a boil and continue to simmer on low heat. The longer it cooks, the better the taste and creamier the curry.
Jeera Rice

You will need:

1 Cup Basmati Rice
1 1/2 cups Water
2 tsp Cumin seeds
1 Onion thinly sliced
1 tsp Ginger Garlic Paste
2 Cardamoms
3 Cloves
1/2 " pc of Cinnamon
1 Bay Leaf
2 tbsp Oil

Wash Basmati Rice thoroughly and soak in cold water for 15 minutes.

Heat oil in a pressure cooker. Add the cardamom, cinnamon stick, cloves, bay leaf and cumin seeds. When the seeds begin to splutter add the ginger garlic paste and saute for a minute. Add the sliced onions and fry till soft. Add the water and close lid, turn heat to high. When the steam begins to rise, lower heat and open lid. Drain the soaked rice, add it to the cooker, season with salt and stir to combine. Close lid, turn heat to high and let steam rise again. Place weight and cook for 6 minutes on low heat. Mix well before serving.


Update:

I am sending the Dal Maakhani over to Srivalli's Curry Mela at Cooking 4 All Seasons.

Refreshing Mung Bean Chaat (Salad)

Mung Bean (Whole Moong Dal) is one ingredient I have in my pantry at all times. It can be used in the soaked raw form or can be boiled along with other veggies to make various dishes. I detest the taste of the raw mung bean and prefer it cooked.

Mung Bean can be used before it sprouts or when its still sprouting. For this recipe, sprouted Mung bean tastes best, but I had the unsprouted left over from another dish, and used the same.

You will need:

1 Cup Whole Mung Bean (green gram)
1 Tomato chopped
½ Onion chopped
1 tsp Chaat Masala powder
¼ tsp Chilli powder
3 Green chillies slit (vary according to taste)
Chopped fresh Corriander
½ tsp fresh Lemon juice
Salt to taste

Soak the whole mung bean overnight in cold water. Drain it the next day and place in bowl. Cover and let sit in a warm place for a day. This will make the beans sprout.

Bring water to a boil and add the sprouted mung bean. Boil till cooked through but still holds shape. Drain and transfer to a micing bowl.

Add the chopped onions, tomatoes, chaat masala, fresh corriander and chilli powder. Stir to combine. Cover and refrigerate for 2 hours. This brings the flavours together. Add salt and lemon juice right before serving. Serve chilled.

This can be whipped up in minutes if you have the sprouts on hand. If you don’t have sprouts, then skip the soaking and sprouting steps. Boil whole mung in a pressure cooker till done. Drain and toss with the remaining ingredients. Serve.

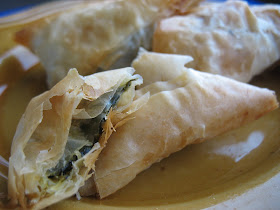
Spanakopitas

Sounds like Greek? Well it is Greek! :D Spanakopitas is a Spinach and Feta Cheese Pie or Phyllo triangles stuffed with a Spinach and Feta mixture.

The first time I had Spanakopitas was at an annual Greek festival here in Atlanta.

You will need: (Makes 24-26 triangles)

1 lb Spinach, thoroughly washed and chopped
1 stick (1/2 cup) plus 1 tbsp Butter
1/2 Cup Feta cheese, crumbled
¼ tsp Ground Nutmeg
20 Phyllo sheets, thawed
½ Cup chopped scallions (white and green)
Salt and pepper

Melt 1 tbsp of Butter in a pan. Add the chopped scallions and sauté for a minute. Add the chopped spinach and cokk till wilted down, about 4 minutes. Season with nutmeg and pepper. Stir in the feta cheese and turn off heat. Let the mixture cool completely. Taste and season with salt, only if required( Feta is salty)

While working with Phyllo sheets always remember to keep them covered, first with two overlapping layers of plastic wrap and then a damp paper towel on top. Phyllo sheets tend to dry up very quickly and once they are dry they crumble instantly and cannot be used.

Melt the remaining butter. Take one phyllo sheet and apply the melted butter using a pastry brush. Place another sheet on top and then cut the sheet into 6 strips. Place the narrow end of the strip towards you, and then place about a tbsp of the cooled filling. Fold one corner over the filling and fold upward to close the triangle. Continue folding till the entire strip is folded.

Place on a baking sheet. Brush the tops with melted butter. Bake for 20-25 minutes till golden brown.

Spanakopitas make excellent appetizers and are best when eaten hot.

Greek Festival

My husband and I went to a Greek festival last month, held every year by the Greek Church here in Atlanta. I was very eager to get my first taste of Greek food. The festival showcased Greek heritage and culture, through their elaborate costumes, dances and the delicious food.

We tried Spanakopitas and Saganaki (also called Greek Flaming Cheese) - which is nothing but Feta or Kasseri cheese deep fried and served with a drizzle of brandy on top. The brandy is usually lit up before serving and a friendly cheer "Opa" resounds through the gathering before the cheese is eaten.

Spanakopitas is a spinach and feta cheese pie. Made with phyllo dough, its a light and tasty appetizer.

Pita Bread, Hummus and Spanakopitas

Saganaki (Greek Flaming Cheese)

The traditional dance

"The May Pole" Dance

It was a pleasant evening and I was really glad that we went to this festival. It was good to get a feel of another country's culture and food.

I made Spanakopitas recently, that's coming up in the next post.