CCC Rasam & Garlicky Eggplant

Nothing is more satisfying than a home-made lunch, a South Indian one in particular. It doesn’t have to be an elaborate thaali to make it comforting. A simple meal of hot rice, aromatic rasam, an accompanying veggie side dish, yoghurt and Ajji’s Avvakayi pickle…aahhhh bliss!


This afternoon, after a really long time, I made a new rasam which my mom-in-law told me about. It was a change from the usual rasams I make. Made with Cumin seeds, Corriander seeds and Coconut; hence the name CCC Rasam. To go along with it I made an Eggplant side dish.


You will need:

For the Cumin, Corriander, Coconut Rasam:


Pressure cook: (till dal is soft)

½ cup Tuar Dal

1 Tomato chopped

Dry roast:

1 tsp Cumin seeds

1 tsp Corriander seeds

5 Green chillies


¼ cup Coconut

Salt to taste

Few curry leaves

Chopped cilantro

A small piece jaggery

1 tsp Tamarind paste


Mustard seasoning: Mustard fried in a teaspoon of oil with a dash of asafoetida (hing)


Powder the dry roasted seeds in a blender. Add the roasted green chillies, coconut and coriander. Also add the boiled tuar dal and tomatoes. Blend together till the dal is completely mashed.


Transfer to a vessel and bring to a simmering boil on medium high heat. Add the jaggery, tamarind paste, salt and curry leaves. Bring to a full boil and then turn off heat. Add mustard seasoning.


Garlicky Eggplant:


1-2 long eggplants, washed and stemmed

½ tsp Mustard seeds

2 Garlic cloves, grated

1 tsp Chilli powder

2 tsp Oil

Salt to taste


Heat oil in a non stick pan, add mustard seeds. Cut eggplant into bite size pieces. When they begin to splutter, add cubed eggplant and toss to coat with oil. Cook on medium heat till the eggplant is soft. Add the grated garlic, chilli powder and salt. Mix well and let the garlic cook for a while. Remove from heat.


This was a perfect meal for a lazy Saturday afternoon. I think its time for a siesta! (Yawn)..


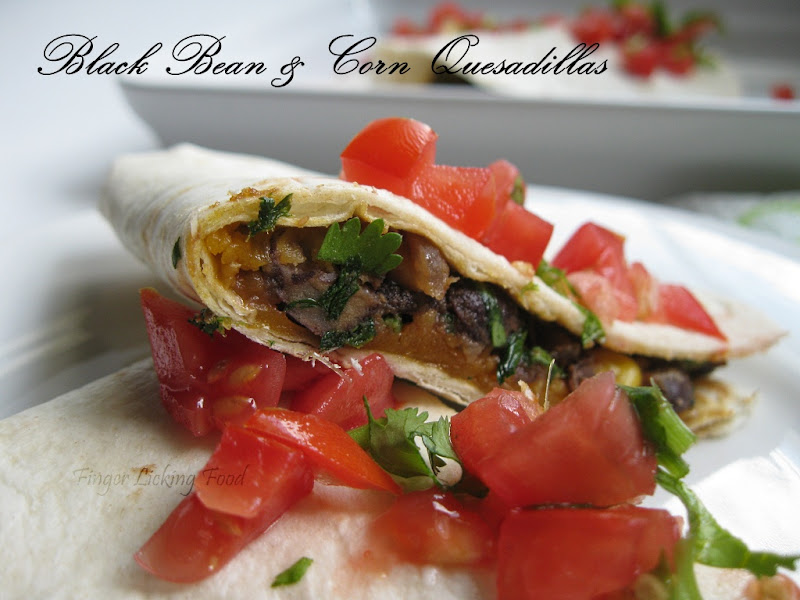
Black bean, Red pepper and Corn Quesadillas:

My pantry is always stocked with different varieties of canned beans and of course canned yellow corn. I simply love the combination of black beans and yellow corn and have used it in various dishes in the past. This afternoon I made a simple Quesadilla using the ingredients I had on hand and I was pleasantly surprised how quickly lunch came together.


A Quesadilla is a Mexican snack usually made with corn tortillas and cheese. Various other fillings can be used including meat, vegetables and seafood.


Black Bean, Red Pepper and Corn Quesadillas:


You will need:


1 cup Black beans, from a can, drained and rinsed

½ cup Yellow corn, frozen or canned

½ cup red bell pepper, chopped

½ cup Red onions, chopped

2 tbsp Oil

½ tsp Cumin powder

2 tsp Hot sauce (I used Sriracha)

2 tbsp Chopped fresh cilantro

Salt to taste

6 Flour tortillas white/wheat

1 cup Sharp yellow cheddar cheese, shredded


Heat the oil in a pan. Add the red onions and bell pepper. Sauté till the veggies are soft, about 5 minutes. Now add the corn, black beans, cumin powder and hot sauce. If using frozen corn, cook till corn is done. Otherwise toss to coat all the veggies with the cumin powder and hot sauce. Cook for a minute and turn off heat. Let cool slightly and then top with chopped cilantro.


Heat a cast iron skillet, place a tortilla and warm through 10 seconds on each side. Place tortillas covered till ready to use to prevent them from turning hard.


Take one tortilla, on one half of the tortilla, place about a ¼ cup of cheese and spread to cover the half. Place a spoonful of the bean mixture over the cheese. Flip the other half of the tortilla over the filled side. Slowly transfer to the hot skillet, and cook till cheese melts. This needs to be done on low heat, to prevent the bottom part of the quesadilla from charring. Once the cheese has melted, remove from heat. Repeat with remaining tortillas.


Alternately, you could fill the tortilla while its on the pan, and press another tortilla over the filled one, basically sandwiching the cheese and bean mixture. Cook till cheese melts and then cut into wedges.

If you have left-over bean filling, store in an air tight container in the refrigerator. You can toss it with cooked pasta or eat it just the way it is.


We had our quesadillas with a fresh tomato salsa. In a small bowl combine a chopped roma tomato, 1 tsp chopped cilantro, salt to taste and a chopped green chilli. Let sit for 30 mins and then spoon over quesadillas.


The colours are a feast to the eyes and the flavours...mmmm you would have to try it to savour it.


A healthy lunch in a snap!


Revisiting Alaska

Last week was a hectic one and much that I enjoyed completing all the orders, I sure was wishing for this week to get here soon. This week is much more relaxed. Weather was pleasant today and I couldn't help but reminisce the very pleasant time we had in Alaska last month. We were vacationing there for a week visiting the cities of Anchorage, Seward and Denali. Each city was different with changing landscapes, people and weather.

Here are some pictures from our trip. It was hard to choose a few to share here, but I promise I will share more when I get a chance.

On the way to Byron Glacier, near Portage, Whittier

Byron Glacier

Exit Glacier, Seward
Exit Glacier up close

The most fascinating thing in Alaska, for me, other than the untouched wilderness and scenic nature, was the undying sun, which would set at midnight, which makes about 20 hours of daylight. Even after sunset, it felt like late evening, 'nights' was never completely dark.

10 pm, Denali

More pics to come!

Spicy Corn Relish

For a while now my cookbooks have been collecting dust. Yesterday however, I was able to unwind a little and sit down with one of my favourite cookbooks in my collection, “Red Hot – A Cook’s Encyclopedia of Fire and Spice”, to try something new. My hubby and I both love spicy food and I never hesitate to turn up the heat in any dish. This book features a wide array of recipes using different chillies, both dried and fresh. I was planning to make Enchiladas with the Guajillo sauce that night, and wanted something to go along with it. This sweet corn and pepper relish was just the right thing.


A relish is a cooked pickle, chopped vegetable or fruit which is typically used as a condiment. (Source: Wikipedia)


You will need:

1 large red onion, chopped

3 fresh Red chillies, chopped

2 Garlic cloves finely chopped

2 tbsp Oil

1 tsp Mustard seeds

½ tsp Corriander powder

½ tsp Corriander powder

1 ½ cups Sweet corn kernels (from cans)

Juice from one lime

Chopped Cilantro

Salt to taste


Heat oil in a pan. Add the mustard and when it begins to splutter add the chopped garlic, onions and red chillies. Saute till onions are soft and cooked through. Now stir in the coriander powder. Cook for a minute and then turn off heat. Stir in the sweet corn and season with salt. Drizzle the lime juice, combine and garnish with fresh chopped cilantro.


This can be eaten warm or at room temperature. Opt for canned corn rather than frozen, if possible, as the canned kernels are ready to use. Saves cooking time.


I did cut back on the chillies just a little bit since the Guajillo sauce is smoky and spicy in itself. The sweet corn was a perfect blend to the heat from the enchiladas. You can store leftover relish in an air tight container in the refrigerator for two days, makes for a good snack too.


Turning two and still on…


It feels like it was only yesterday that I came upon a million food blogs which inspired me to start my own. It’s hard to believe this space turns two today and I must say it has been an incredible journey so far. I’ve made new friends, came upon a million more blogs and definitely learned to take better pictures!!


I watched the movie Julie & Julia a couple of days ago. It is a wonderful movie and you will surely enjoy it even more if you are a foodie. The movie inspired me in a strange way; I was in awe of Julie’s ability to get through 500+ recipes of Julia Child’s in a year’s time inspite of all the ‘meltdowns’ she has. And what struck me the most, well, it’s a coincidence – Julie starts her blog about Julie/Julia Project on Aug 13th, the very same date I started my blog two years ago. It just made me happy within, silly me! I couldn’t have watched the movie at a better time…


I would like to thank each and every one of you out there who has been reading my blog and leaving encouraging, suggestive and appreciative comments. Thank you for your emails from half way across the globe, which immensely justifies the hard work I’m putting into this space. I do hope you will continue to visit me.


Thank you all very much once again! Enjoy a chocolatey cupcake from me on this occasion. :)


Cheers,

Namratha

Chilli Baby Corn

A few days back I was flipping through old photo albums, memories from school and college. Back then we didn't own a digital camera and so the pictures are not only limited, but are a pleasant few. There is one picture of my friends and I eating at a roadside "chaineese" gaadi. This was one place we frequented, anytime hunger pangs hit. Much that this gaadi wala's menu was fun to read - bcoz of all the various ways you can spell (read misspell) 'chinese' dishes, his food was to die for! I don't quite remember eating Baby corn there, but mom made Baby Corn Manchuri or Chilli Baby corn at home.

With all these thoughts of yummy manchuris I simply had to make some right away. We like our food spiccyyyy, so if you want to try this and are not up for a heat attack on your tastebuds, tone it down to the way you like it.


You will need:


15-20 Babycorn, cut lengthwise and into one inch bits

½ Cup Cornflour

Water as required

Oil for deep frying

2 tbsp Oil

1 Bellpepper, cut into 1” strips

1 Onion, cut into 1” strips

4 cloves garlic, chopped

½ tsp grated Ginger

12 Green chillies, cut lengthwise

2 tsp Dark Soy Sauce

1 tsp Hot chilli paste

½ tsp Sugar

Salt to taste


Make a paste of cornflour using water. The consistency should be enough to coat the babycorn. Drop in hot oil and fry till golden brown, drain on paper towels.


In a non-stick skillet, heat the 2 tbsp of oil. Add the green chillies, chopped garlic, grated ginger, onions and bell pepper. Saute on medium heat, till the onions are translucent and bell pepper is soft. Add the soy sauce, hot chilli paste and sugar. Cook for 30 seconds and then stir in the fried baby corn. Coat the baby corn with the sauce and veggies.Cook for a minute and season with salt.


Mmmmm, this was lip smacking good!!


Pesarattu(Moong Dal Dosa) with Upma

Pesarattu is a popular breakfast dish in Andhra Pradesh. Traditionally it is served with a sprinkle of onions and fresh corriander on the inside, eaten with coconut chutney. This tastes best when freshly made and not a dosa you can stop at one :) Adding upma on the inside adds to the taste and is probably a practice which started off in South Karnataka (more so in Telugu households) to make the dosa more fulfilling.


There are two ways of making Pesarattu. One with whole green moong dal and the other with split yellow moong dal. The taste of the dosa varies from one another. I personally prefer the whole green moong, which imparts a nice green colour to the dosa, a change from typical white dosas.

You will need:
For the Pesarattu: Makes 8-9 dosas

½ Cup Whole green Moong, soaked overnight

3 tbsp Rice flour
6 Green chillies
Salt

For the upma:
2 tbsp Oil

½ tsp Mustard seeds
½ tsp Urad Dal
½ tsp Chana Dal
¼ cup onion, chopped
Few curry leaves
½ cup Semolina, dry roasted
1 cup Hot water
Salt to taste

Pesarattu Toppings:
Chopped onions, chopped cilantro


Prepare the Batter: Grind the soaked moong dal and green chillies with little water to a smooth paste. Stir in the rice flour and salt.


Prepare the Upma:
Heat oil in a pan. Add the mustard and when it begins to splutter, add the urad and chana dals. Add the curry leaves and chopped onion. Saute till onion is soft. Pour the hot water and bring to a boil. When the water begins to boil slowly add the roasted semolina while stirring to avoid lumps. Turn heat to low and cook covered for 3 minutes. Add salt. Remove from heat.


To make the Pesarattu:
Oil a hot non-stick pan. Wipe the oil with a paper towel. Pour a ladle of batter in the centre and swirl clockwise with the ladle. Drizzle a tsp of oil on top. Top with chopped onions and cilantro.


Cook for 2 minutes and then flip, cook for another 15 seconds. Flip over and place two tablespoons of upma on one half of the dosa. Close the other half over the upma. Remove from heat.


Before making another dosa, wipe the pan with the paper towel. If the pan is oily, then its hard to swirl the batter. We had our Pesarattus with Garlic chutney.


Make this over a weekend and savour the dosas at your own pace. :)

Blog Widget by LinkWithin