Showing posts with label Chocolate. Show all posts

WOYP Day # 48 Roasted Almond (Eggless) Chocolate Ice Cream


We've had plenty hot days here in Atlanta already and my boys are constantly asking for cold stuff to cool them off. We've had our fair share of ice-creams and desserts but its never enough!! :D I'm a big fan of Chocolate Ice-cream and Almonds on Chocolate ice cream is one of my favorite toppings. Crunchy nuts in every bite of creamy chocolatey goodness mmmm..! Once you have the right ice cream base, the mix-in options and possibilities are endless. I’ve used roasted Almonds (roasting instructions below) but you can use mini chocolate chips, mini marshmallows, roasted cashew nuts and pretty much anything you want :) This is an easy Eggfree Chocolate ice-cream. 

 
I’ve switched to using Organic Cacao Powder ever since our local Costco began selling it last year. Cacao powder is made from beans that are fermented but not roasted. These beans are processed at a lower temperature and then milled into a powder. This yields a bitter, more nutritionally rich powder. Cocoa Powder on the other hand is made from beans that have fermented and roasted, typically processed at much higher temperatures. This yields a slightly less bitter, darker powder which has lost some of its nutritional value. I’ve used Cocoa powder for a very long time but I’m loving Cacao powder. I use it extensively in baking, frostings, ice-creams, smoothies. It yields a rich tasting end product and I’m glad I made the switch. Cost wise it has been pretty effective and not expensive. If you come across this, grab a bag and you won’t regret it. 

 
The end result will taste only as good as the ingredients you use. So make sure to use organic ingredients if available. I’ve also used an Ice-cream maker but if you don’t have one, I’ve included no-churn instructions too. 
 
Roasted Almond Chocolate Ice- Cream
You will need:

7 oz Condensed Milk
1/4 cup Organic Cacao Powder *
1 1/4 cup Heavy Cream
1/4 cup Whole Milk
2 tsp pure Vanilla extract
1/4 Roasted Almonds, chopped (instructions below)

*If you don’t have Cacao Powder you can substitute with a good quality unsweetened Cocoa powder.
 
In a saucepan, combine the condensed milk, whole milk and Cacao powder. On low heat whisk to combine until smooth and slightly thickened, about 3 minutes. Turn off heat and allow to cool. This ensures the cacao powder dissolves well and there is no powdery residue mouth feel once the Ice-cream is churned.


To this, add the Heavy cream and vanilla extract. Combine well. Transfer to a container and chill for 6-8 hours or overnight. Churn in ice-cream maker as per manufacturer instructions. Half way through churning, stir in the chopped roasted almonds. Transfer to an air-tight container and freeze for 4 hours or overnight.

No-churn instructions: (No ice-cream maker)
 
In a saucepan, combine the condensed milk, milk and Cacao powder. On low heat whisk to combine until smooth and slightly thickened, about 3 minutes. Turn off heat and allow to cool completely.

Chill a large bowl and beaters for 20 minutes. Pour whipped cream into chilled bowl. Add vanilla and beat on medium low speed until soft peaks form.  To this gently stir in the cooled Cacao-condensed milk mixture. Combine gently using a spatula. Chill this mixture for 20 minutes and then rewhip using a hand held beater until thick and stiff. Add the chopped nuts and fold in gently.  Transfer to an air-tight container and freeze for 4 hours or overnight. 


To Roast Almonds:

Place nuts evenly on a small baking sheet or pan. Place in a 335F pre-heated oven. Bake for 5 minutes, stir nuts and return for another 2-3 minutes. Keep an eye on the nuts if they are browning too quickly remove from the oven and transfer nuts to a plate immediately. Nuts continue to cook if left on the hot baking sheet. 


To serve:

Set the ice-cream out on the countertop for 2-3 minutes before scooping. Scoop into bowls, top with more chopped roasted almonds and this super awesome, easy Hot Fudge sauce. This is sure to transport you to Chocolate Heaven! :D 


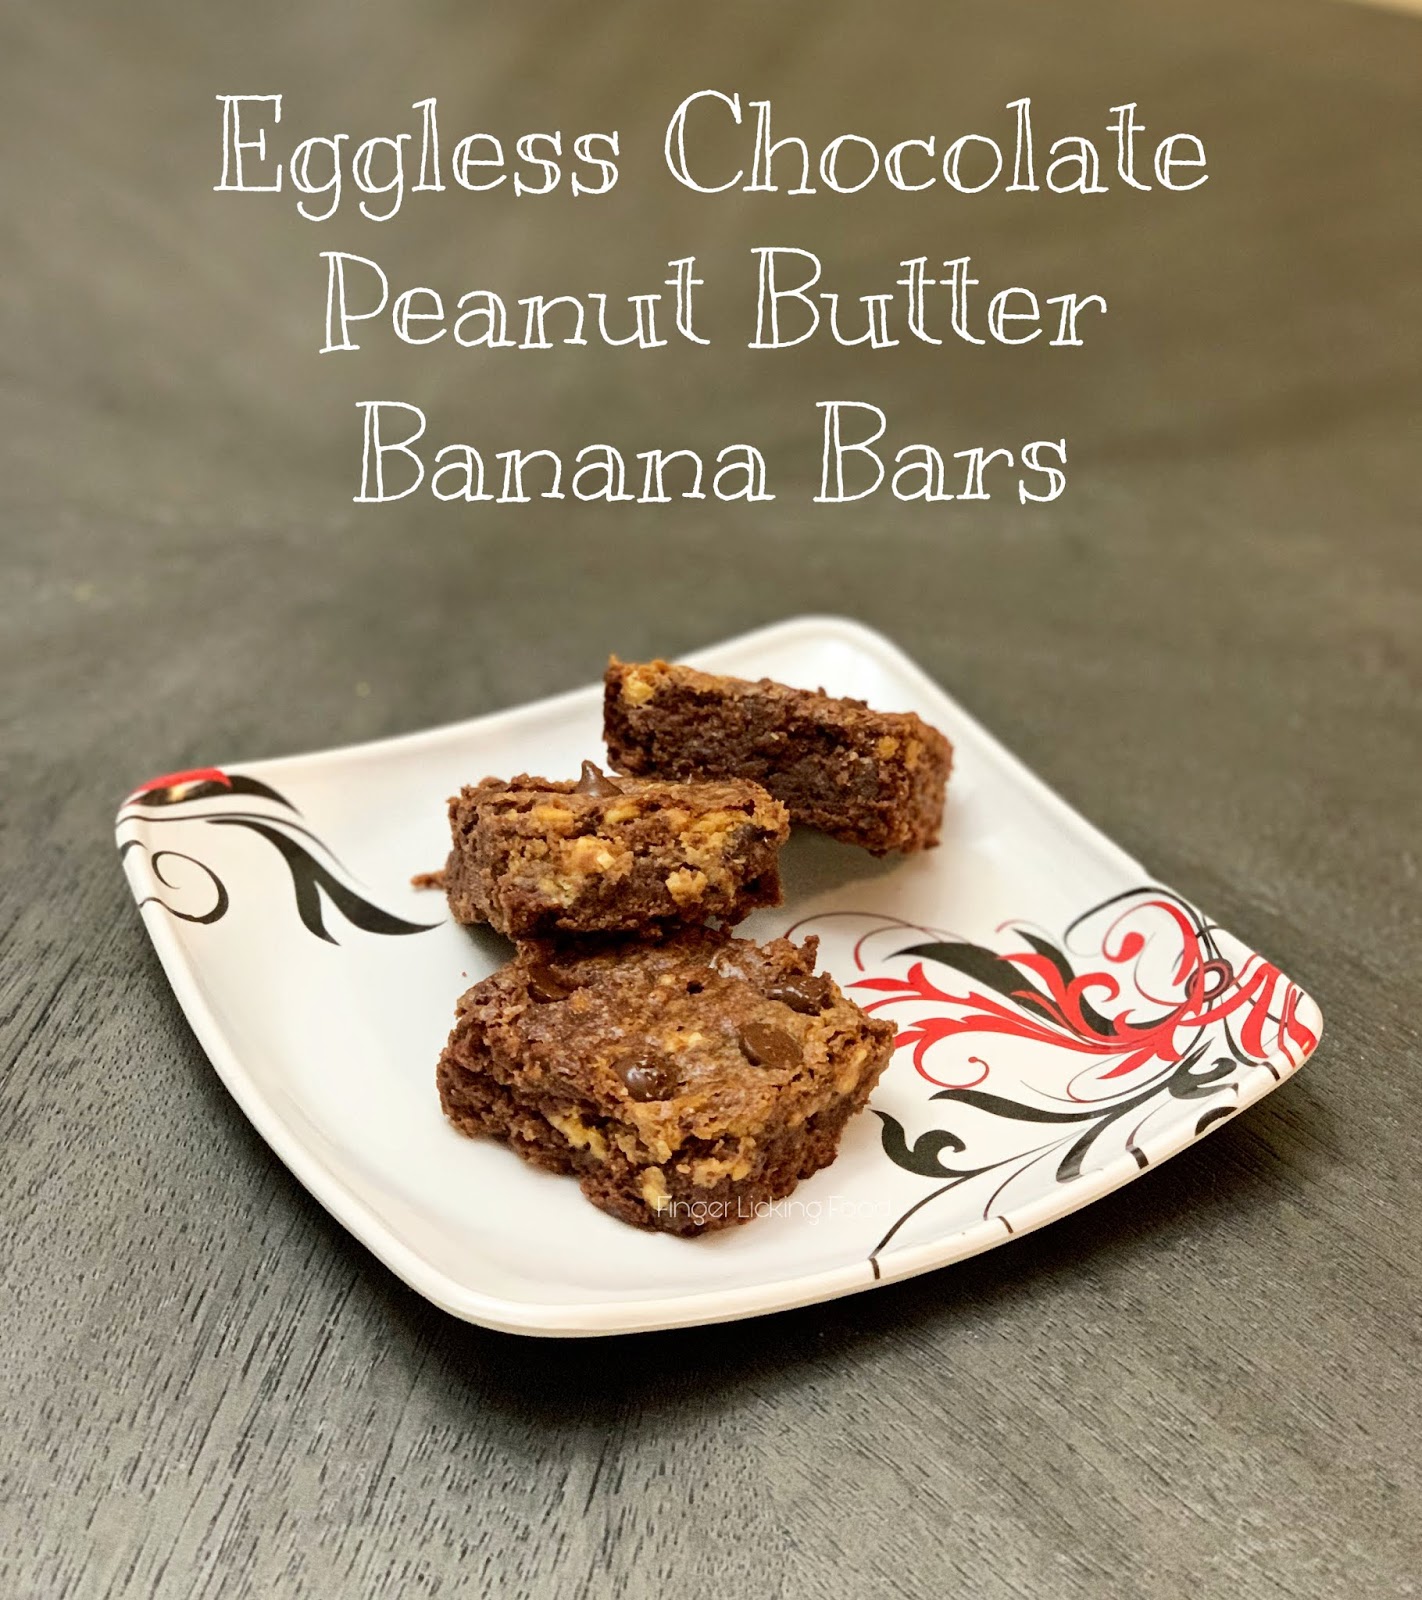
What's on Your Plate? Day #15 - Eggless Chocolate Banana Peanut butter Bars


Ever since the #stayinplace orders have been enforced I haven’t had a chance to bake at all since the focus has been on cooking :) My boys were probably missing all the baked treats they were regularly getting so my younger one insisted I bake something today and he also wanted to learn to bake. So I figured I’d make something simple for him to follow and help with. He did help measure and mix and he very very eagerly waited for it to be baked and cooled so he could eat..or devour in this case! :D 


These eggless Chocolate Banana Peanut butter bars are easy to put together and Peanut butter is a tasty crunchy addition. I had bananas that were way past their prime and crunchy peanut butter on hand, so that they went together. I thoroughly enjoy peanuts on a chocolate sundae so figured they would taste good together. Tasty amalgamation indeed!

You will need:

3/4 cup All-purpose flour
1/4 cup Cocoa powder + 1 tbsp
1/4 tsp Salt
2 large ripe bananas
1 cup sugar
1/2 cup unsalted butter, melted
 1 tsp vanilla extract
1/4 cup crunchy peanut butter
1/4 cup Chocolate chips

Preheat oven to 350F. Butter an 8”x8” square baking pan. Dust with a tablespoon of cocoa powder. You can use plain flour too.

In a bowl, mash the bananas with a fork. Add the sugar, melted butter and vanilla. Whisk well until combined. Sift flour, salt and cocoa powder over this banana mixture and combine well. Warm the peanut butter in the microwave for a few seconds until easy to mix. Add to the prepared batter and combine well.

Pour batter into prepared pan. Top with chocolate chips.


Bake for 30- 35 minutes. Cool completely before slicing. You can also chill the whole pan before cutting into bars.We of course couldn’t wait until  they were chilled and went for these bars right away. These were incredibly delicious and had to stop everyone from eating all of it! 


These bars would taste great with some vanilla ice cream too….yum!!


C for Chocolate Eclairs I How to make Chocolate Eclairs - Day 3


In this post we travel all the way to France, literally of course.. through Chocolate Eclairs. These have been on my to-do list for such a long time that I was wrote down Chocolate Eclairs first on the A-Z list. You can follow the link at the bottom of the post to know more about this month's Blogging Marathon. 

C for Chocolate Eclairs - FRANCE 


Chocolate Eclairs are a French confection made with a pate a choux, a soft dough cooked to dry out a bit and then piped into either puffs or long shells. These shells are then filled with a super delicious pastry cream, trust me when I say super delicious.. I had to try really hard to not eat it all with a spoon! The tops are then dipped in chocolate. I've been in chocolate heaven lately, last month I made 3 chocolate dishes back to back.. remember the Hot Fudge Sauce? If you don't then just click on the link and drooool! Ok , back to Chocolate Eclairs. I made Mini Eclairs, easily eaten in a bite or two. 

My first rendezvous with Pâte a Choux was when I made Croquembouche & a Piece Montee for the Daring Bakers. It was my first taste of cream puffs and boy was it good!! I followed the same recipes for the pate a choux and the pastry cream. 

You will need:
For the Vanilla Crème Patissiere (Half Batch)


1 cup (225 ml.) whole milk

2 Tbsp. cornstarch

6 Tbsp. (100 g.) sugar

1 large egg
2 large egg yolks
2 Tbsp. (30 g.) unsalted butter
1 Tsp. Vanilla


Dissolve cornstarch in ¼ cup of milk. Combine the remaining milk with the sugar in a saucepan; bring to boil; remove from heat.

Beat the whole egg, then the yolks into the cornstarch mixture. Pour 1/3 of boiling milk into the egg mixture, whisking constantly so that the eggs do not begin to cook.

Return the remaining milk to boil. Pour in the hot egg mixture in a stream, continuing whisking.

Continue whisking (this is important – you do not want the eggs to solidify/cook) until the cream thickens and comes to a boil. Remove from heat and beat in the butter and vanilla.

Pour cream into a stainless steel/ceramic bowl. Press plastic wrap firmly against the surface. Chill immediately and until ready to use.

This can be made 2 days in advance. Use chilled. 

Pate a Choux 
(Yield: About 28 large puffs, 40 Mini eclairs)

¾ cup (175 ml.) water

6 Tbsp. (85 g.) unsalted butter

¼ Tsp. salt

1 Tbsp. sugar
1 cup (125 g.) all-purpose flour
4 large eggs


For Egg Wash: 1 egg and pinch of salt

Pre-heat oven to 425◦F/220◦C degrees. Line two baking sheets with parchment paper.

Preparing batter:
Combine water, butter, salt and sugar in a saucepan over medium heat. Bring to a boil and stir occasionally. At boil, remove from heat and sift in the flour, stirring to combine completely.


Return to heat and cook, stirring constantly until the batter dries slightly and begins to pull away from the sides of the pan.

Transfer to a bowl and stir with a wooden spoon 1 minute to cool slightly.
Add 1 egg. The batter will appear loose and shiny.

As you stir, the batter will become dry-looking like lightly buttered mashed potatoes.

It is at this point that you will add in the next egg. Repeat until you have incorporated all the eggs.


Piping:

Transfer batter to a pastry bag fitted with a large open tip (I used Wilton #2D) Pipe choux into 1-1.5 inches long fingers about 1 inch apart in the baking sheets. You can make 3-4 inches long eclairs too. 

Using a clean finger dipped in hot water, gently press down on any tips that have formed on the top of choux when piping. You want them to retain their ball shape, but be smoothly curved on top. 

Brush tops with egg wash (1 egg lightly beaten with a pinch of salt).

Bake the choux at 425◦F/220◦C degrees until well-puffed and turning lightly golden in color, about 10 minutes. 

Lower the temperature to 350◦F/180◦C degrees and continue baking until well-colored and dry, about 20 minutes more. Remove to a rack and cool.

These shells can be baked 2 days ahead too. Once cooled store in an air tight container. Use when needed. 

Assembly: 

When ready to assemble, take pastry cream out of the refrigerator. Fit a pastry bag with a small flower tip. Fill pastry bag with the cream. 

You can fill these two ways.

Method One: You can make a small hole on one end of the eclair with the piping tip and squeeze gently to fill with cream. The shells are hollow on the inside so they will begin to feel heavy once the cream is filled. 

Method Two: Using a sharp knife slice the shell in half lengthwise. Pipe the cream and place the upper shell on top, like a sandwich. 

Melt chocolate in the microwave in a small bowl or a clean piping bag. I used Ghirardelli chocolate wafers, they are simply the best. I used them to make Cake Truffles, it's my go-to chocolate now. No fuss at all.. melts smooth and easily, sets even more beautifully. 

I didn't want a lot of chocolate on the top, considering these were mini eclairs. Wanted the cream and chocolate to compliment each other than over power each other. So I drizzled a few randomly and few others I drizzled back and forth across the top. Placed a few silver dragees for decoration (optional) 


Chill these for 2-4 hours at the most. If you chill them longer they will get soggy, still tasty but not melt-in-the-mouth kind. 

I had friends over for dinner and served this for dessert. So I assembled them about 3 hours ahead and they were perfect. Chilled, creamy, Chocolatey Eclairs!  

BAKES FROM AROUND THE WORLD:


 Check out the Blogging Marathon page for the other Blogging Marathoners doing BM# 75

Bachelor's Buttons


Have you had your fill of chocolate overload since two days yet? :) There’s more to come. My third and final Chocolate recipe for this leg of BM #74 is Bachelor's Buttons. As kids, my brother and I fought for these as to who gets more when mom made them. Even today I enjoy eating them and it brings back those fond memories. I haven't a clue why they are named Bachelor's Buttons, maybe because they look like buttons..but the Bachelor part is still puzzling. I think it makes for a fun name! 

These sweet bite sized chocolatey balls don’t need any cooking or baking. They are easy to make and will definitely please any kids’ sweet tooth in a jiffy. You may already have all the ingredients in your pantry. 


You will need:
Makes: 20-22

30 Marie biscuits

½ Cup Sweetened Condensed milk

3 tbsp unsweetened cocoa powder

4 tbsp Butter, softened

1-2 tsp Milk, if required


To Roll & Decorate: 

½ Cup Desiccated coconut (Dry coconut powder, not flakes)

Dried cherries,Hershey’s Mini Kisses, Rainbow Sprinkles or Silver Dragees

Place Marie biscuits in a ziploc bag and close it. Using a rolling pin, crush the biscuits until almost powdered. My almost 5-year old enjoyed doing this task, so this a great way to get your kids involved.Transfer contents to a blender and pulse, you will have a fine powder. 


Using a whisk,cream the butter in a medium bowl. Add the fine biscuit powder, the cocoa powder and the condensed milk. Mix to make a soft dough. If it feels dry and breaking apart, add a teaspoon of milk at a time until it forms a smooth dough. Break off marble sized pieces and shape into small balls. Roll in desiccated coconut and press the dried cherry,mini kisses, sprinkles or dragees in the centre. You can leave it as is without any deco on top too. I used Sprinkles since that's what gets my boys super excited. And i added in a few dragees too just because I had them .

My boys wanted to make a flower out of it, so here it is. Needless to say they ate a couple right after! 


Let them air dry for an hour before storing. Store in an air-tight container for 5-7 days. It will last longer if refrigerated.

This is for Srivalli's Kid's Delight event, guest hosted by Kalyani, themed on Chocolates.

  BMLogo


Enjoy these sweet bite-sized Bachelor's Buttons! 


Chocolate Orangey Chocolate Chip Cookies

A mouthful to say and definitely worth it, 'cause these cookies are as tasty as they sound. It's that time of the year again, to bring out those cookie recipes and get baking in the kitchen. The joy of baking and the even better one of sharing these baked goodies with friends and family...a feeling of warmth and happiness.

Chocolate and Orange is a combination made by the food gods, a combination so exquisite that you just can't get enough of it!

Chocolate Orangey chocolate chip Cookies:

You will need

1 cup sugar
2/3 cup butter, softened
1 tbsp Orange zest
1 egg
1 1/2 cups all-purpose flour
1/3 cup unsweetened cocoa
1/4 tsp salt
1/2 tsp baking powder
1/4 tsp baking soda
2 tbsp Orange juice
3/4 cup semisweet chocolate chips

Preheat oven to 350º F.

In a large bowl, beat butter till its light and fluffy. Add sugar, orange peel and the egg. Beat on medium speed till combined.Add the flour, cocoa, salt, baking powder and baking soda. Combine to form a stiff dough. Now add the orange juice and mix to combine. Stir in the chocolate chips. The dough will be sticky.

With the help of a spoon, place small mounds of dough on an ungreased cookie sheet. Flatten to about 1/2-inch thickness with the help of a fork. Bake 9 to 11 minutes or until sides are firm.

Cool for a couple of minutes on the sheet and then cool completely on wire racks. Store in air tight containers.I had to really hold myself back from eating all these cookies! Delicious to the last crumb.


The Orange juice make these cookies more 'orangey', so if you are not a big fan of orange flavoured stuff, feel free to cut back on the quantity or leave it out altogether.


These cookies are off to Eat Christmas Cookies 2 event over at Food Blogga. Don't forget to check cookies from all over the world -- here.


Chocolate Truffle Cake

Being at home with family and friends, I can't remember enjoying a vacation better! I am enjoying all the pampering and the good food both at my mother's and at my inlaws' place.

This cake is decadent and a great treat for chocoholics! My bro being one,this was the second of his birthday cakes.

You will need:

8 (1 oz) chocolate squares
2 1/2 cups milk
1 cup butter, softened
3 large eggs
2 teaspoons vanilla extract
2 2/3 cups all-purpose flour
2 cups sugar
1 1/4 teaspoons baking soda
1/2 teaspoon salt

Chocolate Truffle Filling:

1 oz semisweet chocolate squares, coarsely chopped
1/2 cup plus 2 tablespoons whipping cream
1 to 2 (oz semisweet chocolate squares, finely grated

Stir together the 8oz chocolate squares, milk and butter in a large heavy saucepan over low heat, and cook, stirring constantly, 8 to 10 minutes or until chocolate melts and mixture is smooth. Remove from heat, and let mixture cool slightly (about 10 minutes).

Whisk together eggs and vanilla in a large bowl. Gradually whisk in melted chocolate mixture until blended and smooth.

Combine flour, sugar, soda and salt; whisk into chocolate mixture until blended and smooth.

Pour batter into 3 greased and floured 9-inch round cake pans. (I used an 8" square pan which made two layers)

Bake at 325° for 25 to 30 minutes or until a wooden pick inserted in center comes out clean. Cool cake layers in pans on wire racks 10 minutes. Remove from pans, and let cool completely on wire racks.

Microwave coarsely chopped semisweet chocolate squares and cream in a 2-quart microwave-safe bowl at HIGH 1 1/2 to 2 minutes, stirring after 1 minute and then every 30 seconds until chocolate melts and mixture is smooth and slightly thickened. Let cool slightly (about 15 minutes).

Spread 1/2 cup plus 2 tablespoons Chocolate Truffle Filling evenly on top of 1 cake layer. Top with 1 cake layer; spread 1/2 cup plus 2 tablespoons Chocolate Truffle Filling evenly on top, reserving remaining 1/2 cup Chocolate Truffle Filling. Top with remaining cake layer.

Spread warm semisweet chocolate mixture over top and sides of cake. Chill cake 30 minutes or until chocolate glaze is firm. You can press a metal spatula against the still warm glaze to create a rippling effect. Sprinkle grated semisweet chocolate evenly over top of cake and serve.


Enjoy the chocolatey goodness!

Eggless Chocolate Cake

I’ve done it! I’ve finally baked an Eggless Cake. It is an achievement for me because in my terms a cake without eggs cannot taste good nor can it be moist and fluffy. Well this one proved me wrong.

From the time I’ve been baking and posting recipes here for cakes, I’ve had so many people ask me, including friends and relatives, for a tried recipe for an Eggless cake. Since I had never baked an eggless cake, I had no recipes to offer them. Using eggs was never an issue at mom’s place nor here, and though mom and dad both don’t eat eggs in its original form, they don’t mind cakes with egg in it. Mom has been giving baking classes for ages and she never had to think about baking an eggless cake. So even my mom is in the enquirers list for an eggless cake recipe…hehe

I have been looking online and have come across so many recipes for eggless cakes. The trouble is which one to try. One says only flour, butter and milk while the other says “eggless,butterless,milkless”!! After much browsing and reading scores of recipes, I decided to try this one. It was on a forum on some site. Whoever that person is, thanks to them as this cake turned out great!

The recipe was good by itself, it needed little more liquid than mentioned. I changed that and it was perfect.

You will need:

1 2/3 cups All purpose Flour

1 cup Sugar

¾ cup Cocoa powder

1 tsp Baking powder

1 tsp Salt

1 1/3 cup Buttermilk

½ cup melted Butter

1 ½ tsp Vanilla


Preheat oven to 375F. Grease and flour a 13 x 9 baking pan.

Sift the flour, cocoa powder and baking powder into a mixing bowl. Add salt and sugar. Combine and then add the melted butter, vanilla and buttermilk. Beat till smooth.

Pour batter into prepared pan. Spread evenly. Bake in preheated oven for 25-30 minutes or till a toothpick inserted in the centre of the cake comes out clean.

Let cool in pan for 10 minutes and then cut into pieces and serve.


The texture of the cake was dense,yet moist. It did taste different from a regular chocolate cake with eggs in it, but this was good for an eggless one.

This cake tastes great when it is slightly warm. So dig in before it cools completely!

Now my quest begins for a non-chocolate eggless cake .......

Taste & Create VI – Banana Chocolate Chip Muffins

It’s time for that event again where we get a chance to explore a partner’s blog and make a dish from their blog. Taste & Create is an event created by Nicole of For the Love of Food. It’s a good excuse to actually make something from another’s blog, than just adding the recipe to a “to-try” list.

My partner or should I say partners this time were the mother and daughter duo, Psychgrad and Gizmar of Equal Opportunity Kitchen. They have a wide array of dishes on their blog. As always, my quest was for something which involved baking and I finally zeroed in on the Banana Chocolate chip Muffins.

I followed the recipe to the letter, and halved it to make 6-7 muffins.

Banana Chocolate Chip Muffins:

You will need: (Makes 12 Muffins)

2 cups of all-purpose flour
1/4 cup granulated sugar
2 tsp baking powder
1 tsp baking soda
pinch salt
1 cup chocolate chips
2 cups of mashed ripe bananas (about 4 large)
1/2 cup butter, melted
1/4 cup milk
2 eggs

Preheat oven to 350F.

In a large bowl, whisk together flour, sugar, baking powder, baking soda and salt; add chocolate chips. In a separate bowl, whisk together bananas, butter, milk and eggs. Pour flour mixture and stir just until blended. Fill batter ¾th way into paper-lined muffin pans.

Bake for 25 minutes or until golden brown and tops are firm to the touch.

I baked these muffins on Sunday night and sent them with my hubby to Columbus, Ohio. He has been traveling from work for a few weeks now. I sure wouldn’t have eaten all 6 muffins (7 actually, I ate one!), so off the muffins went with him. He told me his colleagues enjoyed them.

I must say Banana and chocolate come together very well. The muffins were moist and I had to resist eating more than one! Thanks to the ladies at the Equal Opportunity Kitchen for the muffins and to Nicole for another series of Taste & Create.


I also would like to share something with you all. I had sent in two pictures to The Deccan Herald online edition and both of my food pictures have been published.

The Valentine's day hearts I made out of cake can be seen here: (picture in right panel)

The Sankranthi home-made acchu is here: (picture in the bottom of the page)

Blog Widget by LinkWithin