Vegetable Puffs:

Vegetable Puffs is a favourite snack and I remember the endless times we've had these back in India. I missed them when I came here until one day when a friend mentioned using them to make veg puffs. The so-called "pups" (remember that?)are a breeze to make with the frozen pastry sheets.

I made these puffs using the traditional standard veggie filling found in most puffs in Indian bakeries(or atleast in all the places I've eaten these from!)

You will need:

1 sheet frozen puff pastry (thawed)
1 potato small cubed
½ cup fresh/frozen peas
1 carrot chopped
½ cup chopped green beans
1 tsp Garam masala
½ tsp Cumin seeds
½ tsp Chilli powder
Salt to taste
1 tsp Oil

Preheat oven to 350 F.

Boil veggies in boiling water for 3-5 minutes, till just done but not overcooked. Drain and keep aside.

Heat oil in a pan. Add cumin seeds and when it begins to splutter add the garam masala and red chilli powder. Let it sizzle for a few seconds and then add the boiled veggies. Toss to combine well. Season with salt and let mixture cool.

Meanwhile spread the thawed puff pastry sheet, and lightly roll to thin it out a little. Cut into equal sized rectangles. Place a spoon of the filling on one half of the cut rectangle, and fold the other half over the filling. Press sides to seal the pastry.

You can brush the top with beaten egg to help the puffs brown well. Otherwise bake for a minute longer to achieve the golden colour.

Bake for 20-25 minutes. Keep a close watch after 15 minutes and remove when done. Serve hot with your favourite ketchup.

These are great while sitting at home or when on the road so I'm sending them to the "Travel Food Festival" hosted by dear Easy over at Simple Indian Food.

More puff versions here:

Corn Puffs
Egg Puffs

Another version of veggie puffs over at dear Rajitha's blog.

It’s Graduation Day!!

Not from school or college but from my Cake Decorating classes at Michael’s. As I had mentioned in my last post on the cakes decorated during these classes, we had one for this class too. It was a grand finish to a fun and knowledgeable course. We got certificates too!

Like all the previous classes, the first hour and forty minutes went in practicing what we are taught that day and also watching our instructor demonstrate few designs. She makes everything seem so easy…really! We learned to make roses out of icing, that was the highlight of the class. The last 20 minutes of the class, we are allowed to decorate our frosted cakes anyway we chose to.

We made Sweet Peas and Roses

Rose made with icing/frosting

I made the cake using the same recipe as last time. You can find the recipe here.

This time I decided to make layers, and used the frosting and grape jam alternately.


I'm sending this over to Bindiya for the event "My Favourite Things :Cakes & Muffins".

Course 1 was a lot of fun and I'm looking forward to Course 2 which starts next Tuesday.

Onion Curry – JFI onions:

This is one of the simplest and quickest curries, which is great tasting too.


You will need:

4 large onions thinly sliced
1 tsp Mustard seeds
1 tsp Urad dal
1 tsp Chana dal
Few curry leaves
3 tbsp Fried Gram (Dalia/ Hurgadale)
4 dry red chillies
½ cup Grated coconut (fresh)
¼ cup Oil
1/4 cup Tamarind juice
2-3 tbsp powdered Jaggery
Salt to taste
Water if required

Heat oil in a pan. Add the mustard seeds, urad dal and chana dal. Saute for a few seconds and then add the curry leaves. Now add the thinly sliced onions. Saute till the onions are soft and translucent. Meanwhile, in a blender, powder the Dalia and dry red chillies. Then add the grated coconut and pulse 3-4 times. This further breaks up the coconut and blends with the powder.

Once the onions are done, add this powder to it and mix well. Stir in the tamarind juice and powdered jaggery. Add water if you want the curry to be a gravy, don’t add water if you want it to be a dry side dish. Cook till the raw smell of the dalia is gone. Serve hot with chapathis. I added little water to mine and made it a thick gravy.

This is my entry to JFI- Onions hosted by Radhika of Radhika’s Kitchen.

CLICK and AFAM

This month’s fruit is Papaya and when Nags announced this I was wondering what I could make with Papaya because I enjoy the fruit as is and have never bothered making something out of it. I bought a large raw papaya that same weekend thinking that a raw one would give me sufficient time to come up with something. It has been sitting on my table since then, and in a wink has ripened too!! I realized it was high time I made something before it went bad on me. Mom had mentioned a tropical salad long ago and that required papaya, but I wasn’t too sure if a ripe one would do good. I went ahead and made it anyways and it was great.


Exotic Super Salad

You will need:

½ cup Papaya cubed
½ Cucumber cubed
½ cup Pineapple cubed
½ cup Orange segments
2 tsp Mint chutney (recipe here)
2 tsp Olive oil
½ tsp Black pepper powder
½ tsp Salt
½ cup Green gram sprouted (Whole Moong dal) – optional

In a medium bowl place the cubed fruit and cucumber. In another bowl, blend the olive oil, minty chutney, salt and pepper. Pour this over the cubed fruit and toss. Garnish with a fresh sprig of mint. Serve immediately.

I left out the green gram sprouts because I don’t like the taste of the raw sprouts.

I am not a salad person at all but was not too hestitant in making this one because it has fruit in it. I must say I was pleasantly surprised at how well the fruits and the cucumber came together. The mint chuntey made it refreshing and tasty. I think this is one salad I will make again.

This is headed to Nags at For the Cook in Me who is hosting AFAM – Papaya this month.

CLICK -- Liquid Comfort

It is the heart of winter now and other than soups nothing else could be more comforting. But I’ve made a lot of soups this winter and want to stop making them for a while. So I chose to click our favourite liquid comfort in the blazing summer heat. I know summer’s a good many months away, but no harm in gulping down some now as well. Our drink is Minty Ginger Ale with lots of ice, a dash of lime and mint leaves.

I added a mint leaf to each ice cube mold and let it freeze, not only did it make the ice cubes look good with the mint leaves in it, but it also adds to the minty flavour of the drink as it melts.

This picture is my entry to this month's CLICK - "Liquid Comfort" over at Jugalbandi.

A winter day to remember

Last Saturday, the 19th was a beautiful day and it gave me enough reasons to remember for a long time to come.

First, it was my birthday, and my husband and friends made it very special for me. I got lovely gifts and a birthday cake (which I didn’t bake…for a change!)

Second, it snowed on that day! I know, for those living in the North, snow isn’t a big deal, but for us down South in Atlanta, it sure is…atleast for people like me..hehe. It was a beautiful day with the snow falling steadily which covered the ground with a blanket of white.


Third, I got a big catering order on the same day. Hmm, lemme back up for a minute and tell you that I have started food catering from home. Since I love to cook and am so into it these days, I thought I might as well make it more productive and cook for others too. I started in the beginning of this month and two weeks into it, I got my first big order apart from the small orders everyday. I had to make 55 chapathis and Daal for 20 people. For some this is nothing coz they might have cooked for guests at large parties. But for me, it was a big deal as I have never done this before. So on my birthday I was pretty busy in the kitchen between calls from India and cooking. It wasn’t hard on me, as I thoroughly enjoyed it and every now and then I took a break to watch the snow fall which was extremely relaxing.

Here are some pictures from that day.

Birthday Cake -- Red Velvet Cake

Gifts -- Pyrex 21 pc set and a Baking cookbook

My hubby’s gift is still due as I hadn’t decided what I wanted then. Now I know and he has promised to buy me a huge cake decorating kit, that is sure to keep me busy with my cakes and also make me really happy! I am buying it this weekend, so will update the pics soon.

Update:

I just realized I had forgotten to include the best gift I got on my birthday...a hand crocheted muffler from my dearest cousin who lives on the West Coast. She made it herself and coincidentally with the colours I love. It was a very pleasant and sweet surprise, and I was very very happy when I received it in the mail from her. It's beautiful and means a lot since she made it for me :) (I'm kicking myself for not having including this earlier...sorry sis!!)

Unfinished Snow Man...

It was a wonderful birthday and definitely a winter day to remember :)

Of cakes and delicious frosting

I’ve been baking for a while now, and every time I bake a cake, I frost it well, but after that I’m stuck. I have no idea how to decorate it and make it pretty and presentable. I’ve been hanging onto a few tricks like using chocolate gratings and cut fruit, beyond that….I’m blank as a whiteboard.

So to learn the decorating techniques, I decided to take up the Wilton Cake Decorating Classes at Michaels. I’m done with three classes out of the four and it is definitely well worth it. I joined these classes at the right time, coz I know how to bake and am ready to decorate cakes.

We’ve learned to make the frosting, frost a pre-baked cake and also a few decorating techniques. It isn’t as hard as I thought it would be, I’m thoroughly enjoying myself too. For all the cakes I’ve baked till now, I’ve used a whipped cream frosting, so the usual buttercream frosting is new to me. The one taught in the class is very tasty indeed and is white as snow.

Our instructor suggested we use a box cake mix as that would be easy and inexpensive too. But I'm not a big fan of the cake mix unless its chocolate. I obviously would be sharing the cakes made at class with friends and I wanted them to have a good tasting cake too. So the past classes I've used the basic yellow cake recipe from the "New Baking Book" by Better Homes and Gardens.

Basic Yellow Cake

You will need:

2 ½ cup All purpose Flour
1 ¼ cups Milk
2 ½ tsps Baking powder
½ tsp Salt
2/3 cup butter
1 ¾ cups Sugar
1 ½ tsp Vanilla extract
2 Eggs

Preheat oven to 375F. Grease and lightly flour two 8 in. pans. Stir together flour, baking powder and salt. Set aside.

In a mixing bowl beat butter with an electric beater on medium to high speed for 30 seconds. Add sugar and vanilla, beat until well combined. Add eggs, 1 at a time and beat and beat one minute after each addition. Add flour mixture and milk alternately to beaten mixture, beating on low speed after each addition just until combined. Pour batter into pans.

Bake for 30-35 minutes or until a wooden toothpick comes out clean. Cool layer cakes in a pans for 10 minutes and then invert onto wire racks to cool completely. Frost only after cakes have cooled completely.

These are the cakes from my second and third classes. The third class was last night and it was fun making these clown cakes. I was supposed to add another clown on top but ran out of time and it was too late when I got back home to finish it. I piped the word Clown and called it done:)

From my second class:


From my third class:


I'm looking forward to next class, where we "graduate" from Course 1. And of course we will have a Graduation cake too. More on that after the next class.

I'm sending in the Clown Cake to Bindiya for her event " My Favourite things: Cakes and Muffins"

Menthya Miryal Gojju – Methi Pepper Gojju

Garlic is this month’s spice over at Sunita’s World and I couldn’t think of a better dish than Menthye Miryal Gojju, which is a tamarind based gojju and has lots of garlic in it. The name of the dish is a little funny coz it has two languages in it;Menthye which means Fenugreek seeds in Kannada and Miryal which is Whole Black pepper in Telugu. I have no idea yet again how that name came up, but we know it best this way. When granny and mom used to make it back home, we all looked for only one thing in it – garlic!! The pods are so tiny so they would have to put atleast half a dozen heads to keep us satisfied. Luckily for me, here the heads of garlic are huge, so a little does go a long way.

You will need:


¼ tsp Fenugreek Seeds
¼ tsp Whole black pepper crushed
1 tsp Cumin seeds
1 tsp Mustard seeds
1 tsp Urad dal
1 tsp Chana dal
¼ tsp Hing
Few dry red chillies
1 medium Onion chopped
10 Cloves of garlic cut into bits
2 tbsp Tamarind paste
3 tbsp Jaggery (powdered)
2 tbsp Besan flour
½ tsp Rasam powder
Salt to taste

Heat oil in a pan. Add mustard seeds, fenugreek seeds, cumin seeds, crushed black pepper, urad and chana dal. When the seeds begint to splutter, add the dry red chillies. Add the chopped onions and garlic. Saute till onions are soft. Dissolve the tamarind paste in water to make a thick smooth paste. Add this and the jaggery to the onion mixture. Bring to a simmering boil. Add water as you go to make more of the gojju. Don't worry about it being too thin.

Mix the besan flour with water and make a smooth paste. Add this to the tamarind mixture while stirring. This thickens the gojju. Add more of the besan if the gojju is not thick enough yet. Season with salt and taste,add more jaggery if required. Bring to a boil and serve.

This goes great with hot white rice and ghee. This will keep for a week in an air tight container in the fridge.

Menthye Miryal Gojju is my entry to " Think Spice--Think Garlic" event hosted by dear Sunita of Sunita's World.

Vegetable Pulao with Soya Chunks

When my dearest bud Rajitha announced the theme for WBB as “Soy/Soya” I immediately knew what I had to put on the top of my grocery list that week. Fortunately I found Soya chunks in the Indian grocery store. Now bringing the product home was done, but I couldn’t send that in as an entry?!! Deciding whether to make a curry with soya chunks or a rice pilav with chunks in it, took a good while…

Finally I settled on vegetable pulao with the soya chunks. Soya chunks make any dish wholesome and they give a kind of fullness to the dish.


The first time I tasted these ‘meaty, chewy and tasteless”(that was my first impression) chunks was when I was in boarding school. We called it “Mealmaker” then, no idea why that name though. One day of the week either a curry or a side dish had these chunks in them. I soon grew to like them and it had been ages since I ate them till I made this pulao yesterday.

You will need:

2 cups Basmati Rice
8 Green chillies
½ bunch Mint
2 onions thinly sliced
3 Cardamom pods
3 Cloves
1” pc. Cinnamon stick
½ cup Green beans (small French cut)
½ cup Carrots (small French cut)
¼ cup Fresh peas
2 tomatoes chopped
3-4 tbsps Oil or Ghee
1 tbsp Ginger Garlic paste
¾ Cup Soya chunks
Salt to taste
Few drops lime juice
Water – as required to cook rice


Wash and soak Basmati rice for 15 mins. Keep aside. Soak soya chunks in boiling water for 10-12 minutes. Drain and give them a good rinse. Squeeze out excess water and keep aside.

Heat oil/ghee in a pressure cooker. Add Cardamom, Cloves and Cinnamon. Fry for a minute till fragrant. Now add the slit green chillies and thinly sliced onions. Fry till onions are soft and become translucent. Add ginger garlic paste and saute for a couple of minutes. Now add the cut vegetables, tomatoes, peas and the washed mint leaves. Mix well and cook till vegetables are half done. Stir in the soya chunks and add the required quantity of water.

(This depends on the brand of Basmati being used. Check on the back of the rice package for water measurements. In this case I’ve used Dawat Basmati where the ratio of Rice to Water is 1:1 ½ )

Cover the lid and turn the heat to high. When the steam begins to rise, reduce the flame and let sit for a few seconds. Open the lid and add the washed, strained rice. Add salt and a few drops of lime juice. Stir and close the lid, turn heat to high and when the steam begins to rise again, place the weight, reduce heat to low and cook for 8-10 mins.

Turn off when done and let sit for a few minutes before opening the lid. Mix well before serving.

Vegetable Pulao with Soya Chunks is my entry to "WBB: Soy products" hosted by dear Rajitha at Hunger Pangs.

Sankranthi treats

Hope all of you had a wonderful Sankranthi/Pongal. I know I should have made this post yesterday but it was a tiring and long day, couldn’t get down to doing it.

We celebrate Sankranthi with two types of Pongal and Ellu, a dish made with White sesame seeds, roasted peanuts, fried gram, bits of coconut and jaggery. It also comes with sakkare acchu meaning sugar figures in various shapes, which add sweetness to the ellu. Looking at Indira’s acchulu, I was missing home and wished I could have some acchu. My cousin came to my rescue by telling me how to make them at home! I was surprised and was in total awe when I saw her acchu . I asked for the recipe and yay I made acchu at home too. My sis hand molded hers, turning them into leaves and cute blocks, but I was too skeptical about how mine would turn out if I did them by hand, so I played safe and bought the candy molds featuring sea shell shapes.

Sugar Sea Shells on the Ellu Shore

So this Sankranti was special with home made acchu and Ellu. I also made Sweet pongal and Khara Pongal (Spicy Pongal).

Ellu and Sakkare Acchu

To make the sugar figures :

This is the recipe my cousin gave me, I followed it to the T. Worked wonders, and I was all smiles at the end of it :)

You will need:

½ Cup Sugar
¼ Cup Water
¼ cup Milk
Food colour of your choice

Take sugar and water in a non-stick pot and bring to a boil on medium heat. The sugar should start to bubble, add half the milk and stir slowly. The mixture will start to froth. At this point remove from heat, strain into another bowl, this filters the impurities in the sugar. Back in India, as my mom recalled, this process should really ‘purify’ the mixture, back here in the US, its pure as ever already..hehe. I thought I would skip the milk step but my sis said it would make the end product softer, so I decided to stick to the recipe. Pour the mixture back into the pan, bring to a boil again and then add the milk again, Let if froth, strain and bring back to a boil. Remember to stir continuously all along. As you go, the mixture should be a thick and opaque.

To test if it’s the right consistency (my cousin’s tip again), lightly grease a small piece of parchment paper and drop a little of the mixture on the paper. If it solidifies immediately then the mix is ready to be pured into molds. I sprayed the hard candy mold with non-stick spray just to be safe, and poured the liquid into them. Before pouring into the molds, make sure the liquid is free of large bubbles, stir to get rid of any if present.You could stir in food colour of your choice, I used lemon yellow to make the sea shells look pretty. Tap slightly to ensure the liquid is set evenly and also to get rid of remaining air bubbles.

Let sit for 10 minutes. The sugar should have set well. Turn over and tap lightly to release the figures.

Pack it with ellu, and give it away to friends, this is sure to impress them!! :)

Sweet Pongal and Khara Pongal with Tamarind Gojju

Sweet Pongal


You will need:

½ Cup Rice
½ Cup Yellow Moong Dal
2 tbsp Grated coconut
½ tsp Cardamom powder
¼ Cup Powdered Jaggery
Cashews and Raisins
1 tsp Ghee
2 Cups Water
2 Cups Milk

Lightly roast the yellow moong dal in a pan, till its fragrant. Pressure cook rice and moong dal with water and milk . Meanwhile, dissolve jaggery in little water and bring to a boil. Add this to the cooked rice and moong dal. Add the grated coconut and cardamom powder. Bring to a simmering boil Fry cashews and raisins in ghee. Add this to the pongal and serve hot or cold.

Khara Pongal


You will need:

½ Cup Rice
½ Cup Yellow Moong Dal
3 tbsp Grated coconut
1 tsp Cumin seeds
6-8 whole Peppercorns
1 tsp Ghee
4 Cups Water
Salt to taste

Roast moong dal in a pan till fragrant. Pressure cook rice and moong dal. To this add grated coconut and salt. In a small pan, heat ghee. Add cumin seeds and peppercorns. Saute for a few seconds and add this to the pongal. Mix well, bring to a boil and serve with Tamarind gojju.

Tamarind Gojju-- (Pongal Gojju)

You will need:

Equal portions of Tamarind and Jaggery
1 tsp Mustard seeds
1 tsp Urad Dal
1 tsp Chana Dal (Kadlebele)
2 Green chillies slit
1 tsp Oil
1 tsp Besan flour
Salt to taste

Heat oil in a pan. Add mustard seeds and when it begins to splutter, add the urad and chana dals. Add the green chillies and sauté for a minute. Keep aside.

In another pan, bring the tamarind juice/pulp and the jaggery to a simmering boil. Add water to mix them well. In a cup, blend Besan with water to make a smooth paste. Add this to the boiling liquid while stirring to make it thick. Now add the seasoning prepared earlier, bring to a boil. Season with salt and serve.

When I was a kid mom used to send me with the Ellu and Acchu to our neighbours, and my neighbours in turn would give us the Ellu they had made. It’s kinda like a barter system, only difference is you get the same item in return, but prepared with a variety of goodies in it. At the end of the day, I would have collected varieties of Ellu and Acchu from all the houses in our neighbourhood…those were the days!! :)

The first festival of the year has gone by, more to come!

Taste & Create V - Marble Pound Cake

Taste & Create is an event where we get to pick a recipe from another blog, create it, taste it and blog about it. Of course, all of us would have done this once at least, because often a nice dish on another’s blog catches our attention. We create and taste it, but may fail to mention on our blog that we tried their recipe. This event specifies that we choose a dish, try it and most importantly blog about it.

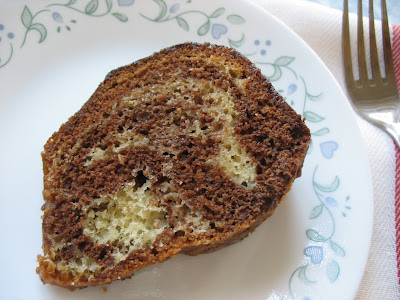
My “Taste & Create” partner was Amy of Tart Reform. She has an array of baked goodies on her blog, and that made it all the more easier for me to pick one. I chose her recipe for Marble Pound Cake with Chocolate Glaze. I have been meaning to try a Marble Cake and couldn’t have come across this event and recipe at a better time.

I followed her recipe for Marble Cake to the letter, and was pleased with the results. I had recently bought a bundt cake silicone pan, and was waiting to try it, finally got a chance to do so.

Since the cake already had chocolate flavour in it, I resorted to a light powdered sugar glaze instead of the bittersweet chocolate glaze.

Marble Pound Cake with Powdered Sugar Glaze

You will need:

3 cups cake flour
2 tsp baking powder
1/2 tsp salt
2 1/2 cups sugar, divided
1/2 cup cocoa powder
6 tbsp water
1 1/2 cups (3 sticks) butter, softened
1 1/2 tsp vanilla extract
5 eggs
1/2 cup milk
Powdered Sugar Glaze (recipe follows)

Position rack in center of oven and preheat to 325F. Grease a 10-inch Bundt cake pan with a non-stick spray. Whisk flour, baking powder and salt and set aside. Blend together 1/2 cup sugar, cocoa powder and water until smooth.

Cream butter with the help of a beater until smooth. Gradually beat in remaining 2 cups sugar. Increase speed until well blended and light (4 min). Beat in vanilla then eggs, one at a time. At low speed add dry ingredients in 3 additions, alternating with the milk in 2 additions.

Add 3 cups of batter to the cocoa mixture and stir until blended. Ladle the vanilla and chocolate batters alternately into the prepared cake pan. Using the end of a wooden spoon, swirl the two batters in light figure eight motion. Do not over mix, this will hamper the marble effect. Bake for an hour, and when the hour is approaching check to see if its done by inserting a cake tester in the centre. If it comes out clean then your cake is done. Depending on your oven cooking capacity, the cake may take longer or lesser time, hence its advisable to check to prevent burning.

Let cake cool in pan for ten minutes before inverting onto a cooling rack. Cool completely before frosting or drizzling glaze.

Powdered Sugar Glaze

½ Cup Powdered Sugar
2-3 Tbsp Milk

Whisk the above together to make a smooth mixture which has pouring consistency.

Drizzle over the cooled cake and serve.

I must say this was one delicious cake and was hard to share. But I had to, otherwise I would have ended up eating all of it!

Hard to Share..Marble Pound Cake with Powdered Sugar Glaze

This post is off to the event "Taste & Create" hosted by Myamii of For the Love of Food.

Tomato and Basil Bruschetta and Creamy Farfalle

Bruschetta is one of the easiest and quickest ways to make a snack which is light on the calories and hard on the satisfying part. There are a million of ways to top French bread, but the classic bruschetta is an all time favourite.

Tomato and Basil Bruschetta

You will need:

½ French bread loaf
2 tbsp Olive oil
1 clove of Garlic
2 Plum tomatoes chopped
Salt and Pepper
½ cup Fresh Basil roughly chopped
Parmesan shavings (optional)

Preheat oven to 350 F. Cut garlic in half and set aside.

Slice the loaf into ½” thick slices. Place on a baking sheet and drizzle with olive oil. Place in the oven for 5-8 minutes till the bread turns crisp. Alternately you could toast the slices in an open pan on the stovetop.

Meanwhile, to the chopped tomatoes, add 1 tsp of Olive Oil, salt and pepper. Stir in the basil leaves.

While the slices are hot, rub them with the cut side of the garlic to infuse flavour into the bread. Top with the tomatoes and garnish with parmesan shavings. Slide a vegetable peeler against a slab of parmesan cheese and you get nice wide shavings.

Serve immediately.

Creamy Farfalle

Farfalle is one of my favourite pastas after Penne of course. I am always well stocked on both and is such a breather when I need to make a quick meal just for myself. When my hubby takes off for lunch on a weekday with his colleagues instead of coming home, I feel lazy to cook rice and daal for myself, that’s when pastas comes into the picture.

You will need:

1 Cup Farfalle (Bow-tie pasta)
½ Red Bell pepper thinly sliced
¼ Cup fresh peas
½ cup chopped fresh Basil
Salt and pepper
2 tbsps Cream
1 tbsp Olive oil
1 clove of Garlic thinly sliced

Bring water in a pot to a boil. Salt the water and add the farfelle, cook for 6 minutes, till done. Drain and keep aside.

Heat oil in a pan. Add the sliced garlic and bell pepper. Saute till done. Add the cream and peas. Simmer, till the peas are done. Stir in the farfalle and basil. Season with salt and pepper and serve.

Tomato and Basil Bruschetta is my entry to Game Night party over at Fun and Food.

I'm also sending in Santa Fe Wraps with Classic Mexican Salsa to the same event. The salsa can be made ahead of time and the wraps can be fixed in a snap.


Blog Widget by LinkWithin