Showing posts with label Snacks. Show all posts

WOYP Day #63 2- ingredient Pizza Dough


I have simply lost count on the number of times I’ve made pizzas and burgers at home since March..since the time we’ve all been confined to our homes! We do order Pizza on occasion but for most part I’ve been whipping up different kinds of dough to keep my boys happy and go mmmm..that’s delicious pizza :D Dramatic indeed, but that’s what keeps my kitchen running..haha! 


Whole wheat pizza dough rates first but that does involve yeast and proofing the dough, and takes time, so when I’m in a rush I make this 2 ingredient Pizza dough. Yes you heard it right, all you need is simply 2 ingredients - Self Rising flour and plain Greek yoghurt!

 
It makes the most amazing thin crust pizzas, dough is ready in 8-10 minutes and the pizza bakes in 13-15 minutes so scrumptious pizzas are ready to dig into in less than 30 minutes!! That’s always a winner in the kitchen. This recipe has been around for years so I can't take credit for it, I did tweak the measurements though. 


Self Rising flour is flour that has salt and baking powder already added to it. If you are unable to buy it now where you live, you can make some by measuring out 1 cup All-purpose flour. To this add 1 1/2 teaspoons Baking powder and 1/2 tsp Salt. Stir to combine and use as needed. 


2-ingredient Pizza dough
You will need:


1 cup Plain Greek yoghurt (full-fat, fat free, 1%, anything works!)
1 1/2 - 1 3/4 cups Self rising Flour

Pizza sauce
Pizza toppings of choice 
Grated cheese
  
Tools:

1 large baking sheet
Cooking oil
Pastry brush

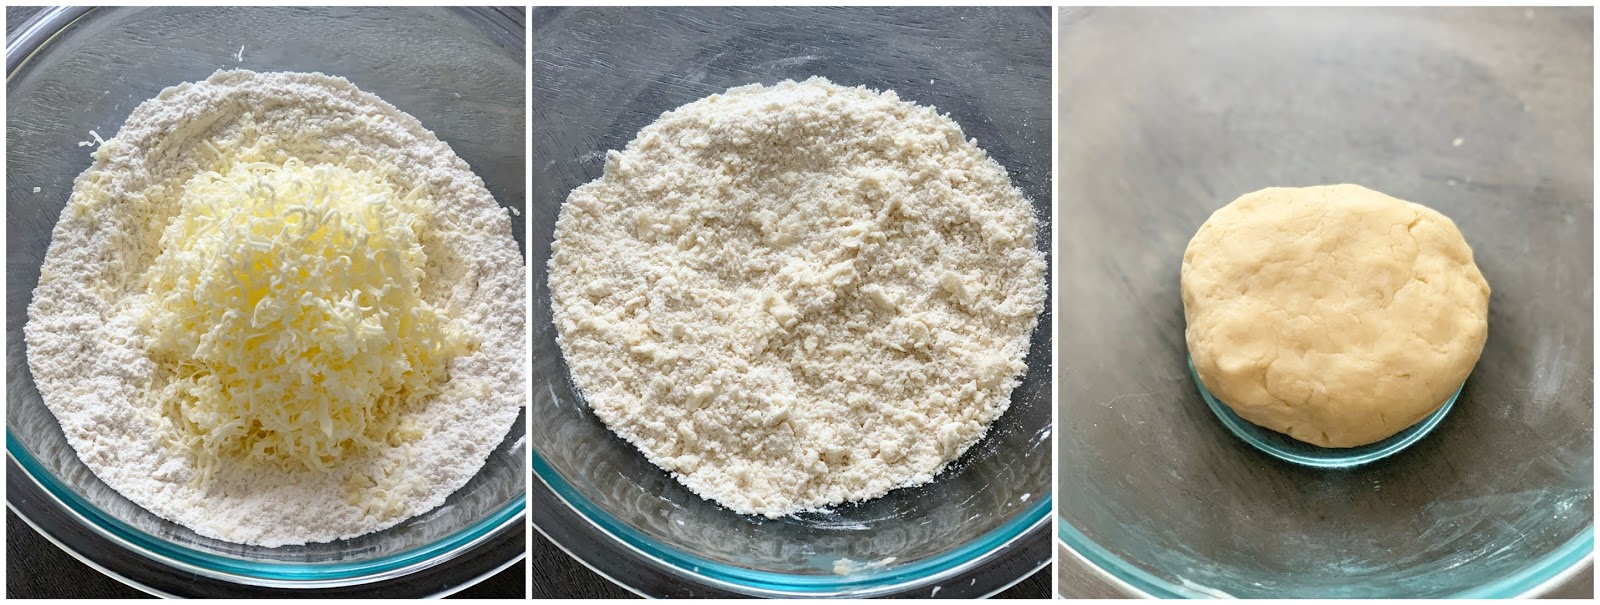
In a large bowl, add the greek yoghurt and 1 1/2 cups self rising flour. Using a wooden spatula or silicon spatula combine to form a soft slightly sticky dough. Turn out onto a lightly floured surface. If the dough feels very sticky add more flour a tablespoon at a time until it forms a firmer dough. Knead the dough for a minute gently to form a soft ball of dough. 


 That’s it! The dough is ready to roll out and bake!!

Preheat oven to 425F.

Using a pastry brush generously grease the baking pan with oil. Oil helps crisp up the dough as well as in easy removal from the baking pan. Normally I use Semolina but with this dough oil works best. So don’t skip that!

Divide the dough into 4 portions. Roll out each piece into a thin circle. At this point any shape is fine!! Don’t stress over the circles. I was able to make two pizzas at the same time on one sheet.

Spread pizza sauce (I use a combination of marinara & ketchup). Spread a layer of grated Mozzarella or any pizza cheese of your choice. Top with veggies - I used thinly sliced onions, mini sweet peppers, green bell pepper and thinly sliced baby corn (canned), and some yellow corn too since the kids insisted! :D Spread little more cheese on top, a generous sprinkle of oregano and chili flakes. 


Place in the oven and bake for 12-14 minutes until the cheese is melted and the edges are nice and crisp. Baking time depends on your oven so keep an eye after 12 minutes.

Remove from oven, slice and serve!! 

  
The quickest pizza you will ever make and eat and the best part is its not frozen!! 


WOYP Day # 59 Pani Puri Puris and Floating Pani Puri


For as long as I can remember, my mom has always made these perfectly shaped crisp puris at home which went into making a variety of Chaats. The puris are very tasty and definitely different from store bought puris. 


 Home made Chaat is scrumptious as is and these puris add to the yumminess! It may seem like a lot of work but I made one batch of these puris in under and hour and it took my family even lesser time to finish all the puris at once!! :D I made Masala Puri and Floating Pani Puri


These Puris can be made well ahead of time, so there is no rush on the day you plan to actually make the chaat. This recipe makes about 80-100 puris, you can make all of it and store so you have puris on hand when the chaat craving hits out of the blue (happens to me all the time! :D) or you can halve the recipe.

Pani Puri Puris
You will need:


1.5 cups Fine Sooji/Chiroti Rave (Fine Semolina)
1/2 tsp Salt
2 tbsp Oil
Oil for deep frying

Rolling pin, 1.75” cookie cutter

Combine the fine sooji and salt in a medium bowl. Add oil and combine. The dough should hold shape when pressed into a fistful. Slowly add enough water to  make a soft smooth dough. The dough shouldn’t be too stiff or sticky. Cover and rest for 30 minutes to an hour.  


Set the oil to heat in a deep pan on medium high heat. Knead the dough for a few minutes after it has rested. Divide the dough into 3 portions. Roll out one portion thinly using a rolling pin.Keep remaining dough covered.  Use a cookie cutter to cut circles. Cut them as close to each other as possible. Remove circles, and gather the scraps. Gather the scraps and roll into a ball before re-rolling. Fry one batch of puris first before cutting out more. 


Test the oil temperature by dropping a pinch of dough into the oil. If it rises quickly to the top then the oil is ready. Slide in the cut circles, the puris will puff up almost immediately. Fry for 15-20 seconds on one side and flip to brown on the other side. Once the puris are crisp, remove to a paper towel lined plate. Lower the heat to medium low while you roll and cut out more puris. Repeat until all the puris are cut and fried. 


Cool puris completely before storing in an air tight container. All the puris puffed up but you may get some flat ones. Those work perfectly to make Masala Puri or Papdi Chaat


Floating Pani Puri:

Traditionally, filled puris are served with a tangy spicy pani to make Pani Puri. On my last visit to Bangalore, I got a taste of these floating pani puris and loved the idea. I have no clue about the origin of the name or why these were served this way, all I know is it tasted just as delicious! :D


You will need:

Pani Puris, as many as needed
1/2 cup Dried Peas (Vatana)
1/4 cup Onion, chopped
1/4 cup Grated carrot
1 tbsp Chopped cilantro
1 Cup prepared Pani (recipe below)
Meeta (Sweet Tamarind chutney), optional

Pani for Pani Puri: 

Grind to a smooth paste - 1/2 cup fresh Mint leaves, 1/2 cup fresh Cilantro, 4 green chilies. Add this paste to 2 cups cold water with 1 tablespoon Pani Puri Masala (store bought), salt to taste and a pinch of Chaat masala. Combine well.  Adjust to taste and serve as needed.

Soak dried peas in sufficient water for 4-6 hours. Boil the peas in a pressure cooker for 2 whistles until soft. Drain the water.

To assemble: Gently crack the top of each puri. Combine the onions, grated carrot and cilantro in a bowl. Fill each puri with the boiled vatana and the onion carrot mixture. Place filled puris in a shallow bowl. Pour 1/4 cup pani over the puris. Add little more if needed. Serve immediately. These are best assembled when ready to eat since the pani will make the puris soft. You can add little meeta to the puris too if needed. I do enjoy a bit of sweet in every bite so I do add meeta in mine. 


WOYP Day # 52 Paneer Tikka (in oven)


Paneer Tikka is a popular appetizer in Indian restaurants, often made in a large Tandoor, which is traditionally a clay oven.  A Tandoor has very high temperatures going up to almost 900 F. The intense heat, comes from a coal fire which is at the bottom. This heats the wall and insides of the oven, allowing food to cook evenly and faster too. An array of foods are cooked in the Tandoor - indian breads like Naan, Roti, a variety of tikkas including Paneer and veggies and a large variety of meats. The clay oven and coal impart a signature smoky flavor to foods cooked in the Tandoor. 

Paneer Tikka cooked in the Tandoor is done using long metal skewers. Cooking in a Tandoor is an art in itself and often there is an assigned chef or cook who is solely responsible for handling Tandoor dishes in restaurants. 

To recreate the same dish at home, neither do we have ovens that go up to 900 F nor is it feasible to have a coal fire all the time (unless you have an outdoor coal grill). So the closest in taste is baking the Paneer and veggies first and then broiling them to give them a char. 


Paneer Tikka:
You will need:

200 gms Paneer, cut into large cubes
Oil 2-3 tbsp
1/2 cup cubed Green bell pepper
1/2 cup cubed Red bell pepper
1/2 cup cubed Yellow bell pepper
1/2 cup cubed Onion

1 tsp Chaat masala
Mint chutney
Thinly sliced onions to serve

Marinade:

1/2 cup Plain yoghurt
1 tbsp Coriander powder
2 tsp Cumin powder
1 tsp Red chili powder
1/2 tsp Chaat masala
1/4 tsp Turmeric
3/4 tsp Salt
1/2 tsp Kasuthi Methi (crushed)

Wooden or Metal Skewers
Foil lined baking sheet

In a medium bowl whisk together the marinade ingredients. Add the cubed paneer, bell pepper and onion. Combine well to coat evenly. Set aside for 2-3 hours or for at least an hour.

Preheat oven to 425 F.

Lightly oil a foil lined baking sheet. Skewer the paneer, bell pepper and onions alternately on the wooden or metal skewer. Place on the oiled baking sheet. Brush more oil on the paneer and veggies. 


Bake for 6 minutes and then place under broiler for 2-3 minutes. This will char the veggies and Paneer. 


Remove from the oven and rest for 3-4 minutes before lifting the skewers off the pan. If you try to remove them right out of the oven the Paneer will rip off the skewer. 


Gently slide veggies and Paneer off the skewers. Sprinkle chaat masala on top and serve with Mint chutney and thinly sliced onions. 


 Savor the soft & spicy Paneer with the crunchy broiled veggies. Yum! :)

WOYP Day # 50 Beetroot Cutlets


Beetroot or Beets, are a popular root vegetable and used in many cuisines around the world. They are packed with essential vitamins, minerals and plant compounds, some of which have medicinal properties. Beetroot contains the Betalain pigment which is responsible for the deep red color. This color, vibrant and beautiful as it looks, can stain skin and clothes, so handle Beets with care. 


Beetroot Cutlets: 
You will need:

1 medium sized Beetroot
2 medium sized Potatoes
2 tsp Coriander powder
1 tsp Chili powder
1 tsp Chaat masala
1 tsp Garam masala powder
1/2 tsp Amchur powder (Dry mango powder)
2 tsp Ginger Garlic paste
Salt to taste
2 tbsp Corn starch

To coat:
2 tbsp Corn starch (mix with water to make a slurry)
Plain breadcrumbs

Oil to deep fry 

 
Boil the beetroot and potatoes separately. Peel and grate them into a large bowl. Add the coriander powder, chili powder, Chaat masala, Garam masala and salt to taste. Also add the corn starch and Ginger garlic paste and combine well. 


The mixture should be firm and hold shape. If it feels soft or sticky, add more corn starch as needed. Form into tear drop shaped patties. 


Heat oil in a deep pan and set it to medium high heat. Dip each patty into the corn starch slurry and then into the bread crumbs. 


 Turn to coat evenly and then drop into the hot oil. Fry on both sides until crisp. Drain excess oil and remove onto a paper towel lined plate. 

 
Alternately, you can shallow fry the cutlets in batches in a wide pan.

Serve hot with ketchup or Mint chutney. 


WOYP Day # 47 Bombay Grilled Vegetable Sandwich


My first memory of digging into this robust multi layered sandwich was years ago when I was probably in high school and we went on our first ever trip to Mumbai (then Bombay) with my parents. These sandwiches are classic, popular street food in Mumbai. A stack of veggies, crunchy and soft amidst layers of buttered bread slathered with a spicy green chutney, these sandwiches are a meal in itself. 

 I’ve made these several times in all these years and realized I haven’t posted it on here. I gotta blame my blogging hiatus once every few years in the past decade :D If you've been a regular reader you would know I go MIA from blogging so I can take focus on cakes.

The green chutney used for these sandwiches is very similar to the Mint chutney we use in Chaat, except this has body to it and is thicker, and yes a whole lot spicier. The chutney has to shine through all those layers or bread and vegetables so a mild tasting chutney simply doesn’t cut it.

Green Chutney for Sandwich: 

 
You will need:

1 cup Mint leaves
1/2 cup Cilantro leaves
1/2 tsp Cumin seeds 
3 pods Garlic
1” piece Ginger, peeled
10-12 green chilies
Salt to taste
2 tsp Lime or Lemon juice
1/4 tsp Black salt


Combine these ingredients in a blender and make a smooth paste. The lime juice helps keep the chutney a nice bright green and balances the heat from the chilies. Store in an air tight container and use as needed. This Chutney can be frozen for up to 3 months.

Bombay Grilled Vegetable Sandwiches:
Makes: 2 sandwiches

6 slices large Sandwich white bread
2 tomatoes, thinly sliced
1 large potato, boiled, peeled and thinly sliced
1 Onion, thinly sliced
1 green bell pepper, thinly sliced
Salt to taste
1 tbsp Chaat masala
1/2 cup grated Mozzarella
1/4 cup softened Butter


Place 3 slices of bread in a row. Butter all 3 slices and then apply the prepared chutney. The butter prevents the chutney from soaking through the slices. If you like it spicy, apply a generous amount of chutney on each buttered slice. On one slice, place the sliced potatoes and onions. Top with a generous pinch of salt and chaat masala. Place the next slice on this. Top this slice with sliced tomatoes and bell pepper. Repeat the salt and chaat masala. Top this slice with a tablespoon or two of grated mozzarella.


 Flip the last slice over, chutney side down, to complete the sandwich assembly.Press down lightly. Apply butter on the top. Time to grill the sandwich.

Heat a Grill pan on medium high heat. Add a teaspoon of butter and spread on the pan. I have a cast iron grill pan which takes time to heat up but retains heat for a long time. Adjust heat according to the pan you use. If you have an electric grill, you can use that too. Once the pan is hot, flip and place the sandwich butter side down. 


Grill for 2 minutes until the bottom is crisp. Butter the top and flip and grill this side for another minute or two.  The butter makes a crisp toast on either side. 


Remove from heat and rest for a few seconds before slicing into 2 triangles using a sharp knife. Serve while still warm with a side of Fries or salted chips.


Couldn't resist the heady aroma of grilled bread and veggies while taking pics and had to take a bite! Yummm! :D

WOYP Day #39 Spinach, Corn and Pepper Mini Tarts


As a kid I enjoyed my mom’s mini Jam Tarts, warm, flaky and filled with gooey mixed fruit jam. Devoured typically in a minute or less :D I’ve used the same Tart dough in these Savory Spinach, Corn & Red bell pepper tarts. The filling is mildly spiced so the kids could eat it too, but you can totally amp the spice levels for adults. These tarts are small and are perfect as appetizers. 


If you don’t have individual tart pans, you can use silicone cupcake liners, a cupcake pan, or a multi design cupcake pan like the one I’ve used. Basically you need something to hold the sides up and form a “cup” to hold the filling. This can also be used in to make one large tart as well instead of individual tarts.

Like with any Tart dough, it is important to start with cold butter.

Easy Tart Dough:

1 1/4 cups All-purpose flour
1/2 tsp Salt
1/3 cup Cold, unsalted Butter
3-4 tbsp Cold Water

4” or 5” cookie cutter
Rolling pin
Tart pans, cupcake pan or cupcake silicone molds
Rice or Dried Beans (any kind)
Parchment Paper or Foil

In a medium bowl, measure out the flour. Add the salt and whisk to combine. Grate the butter over the bowl. Using a for or your fingertips rub the butter into the flour until it resembles bread crumbs. Alternately, you can also cut the butter into small cubes and using a pastry cutter, cut the butter into the flour. Add a tablespoon of water at a time and mix until the dough comes together. Roll into a ball and cover with cling wrap. Refrigerate for 30 minutes. Mom never used to chill the dough and she used to go about making the tart shells right away. I prefer to chill it since it is hot now and I felt it yielded a flakier shell. 


After 30 minutes, transfer dough to a lightly floured surface. Preheat oven to 400F. Roll the dough using a rolling pin, to 1/4” thickness. Using the cookie cutter cut circles and place in the cupcake pan. Gently press the dough to conform to the sides. Repeat with all the dough. Using a fork poke the dough in several places. This is called docking the dough, which prevents the tart from puffing up in the oven. 


Blind Bake the Tart Shells:

These Tart shells are blind baked, meaning they are baked first with either rice or dried beans to weigh the shells down, then baked without them and then a final quick bake with the prepared filling. 


Line each shell with a piece of parchment paper or foil and then pour little rice (or beans) into each shell. Bake for 8 minutes. Remove from oven, remove the rice with the parchment and return shells to the oven for another 4 minutes. Remove from oven, fill each shell with prepared filling. Bake for another 2-3 minutes until filling is heated through. Serve warm.

Spinach, corn and Red bell pepper filling:  
You will need:

1 recipe Tart dough (recipe above)
2 tbsp Oil
1/2 cup chopped Onion
2 tbsp Yellow corn
1/4 cup chopped Red bell pepper
3 pods Garlic,  minced
1/2 cup Spinach, finely chopped
1/4 tsp Dried Oregano
1/4 tsp Red chili flakes
Salt to taste
2 tbsp Heavy cream

Heat oil in pan. Add the minced garlic, onions and bell pepper. Cook for 3-4 minutes until onions and peppers are soft. Add the corn and chopped spinach and cook for 2 minutes.Season with salt and add the chili flakes and dried Oregano. Combine well. Lastly add the cream and combine, cook for a minute and turn off heat.

Allow to cool before filling the shells, you don’t want the hot filling to make the shells soggy. 


We enjoyed these Savory tarts and I see more tarts in the future :D Thanks to my mom for a foolproof tart recipe!


WOYP Day #38 Stuffed Mini Peppers


Yesterday was my older one’s 8th birthday. Poor guy had been planning a summer party since months, but who knew things around us would change so drastically due to CoVID. So we made the best of the current situation and had a small party at home with just us and my cousin’s family. V loves pizza so we ordered out and I made Pull apart Garlic bread and these mini stuffed peppers as appetizers. He wanted a Minecraft themed Dirt Block cake with a few Minecraft characters on top which I made in Fondant. More on the cake in another post :)


The peppers are crunchy, sweet and colorful. They are perfect with a savory dip but I wanted to make something a little more satisfying and decided to stuff and bake them instead. This literally came together in about 20 minutes. I had Goat cheese on hand, that went into the filling. If you don't have any, it can be skipped. 


You will need: 
Serves 4

1 lb Mini Sweet peppers
1 (8oz) can Black beans
2 tbsp yellow corn
2 tbsp oil
3 pods Garlic, finely chopped
1/2 cup chopped onion
Salt to taste
2 tsp Sriracha (or any hot sauce)
2 tbsp Goat cheese, softened
1 tbsp chopped cilantro
1/3 cup shredded Cheddar

Open the black beans and pour the contents of the can into a small pan and bring to a simmer. Drain the liquid and mash the beans with a fork while still warm. Set aside. 


Heat oil in a pan. Add the chopped onion and garlic. Sauté until fragrant and soft. Stir in the mashed beans, yellow corn and season with salt to taste. Combine well. Lastly add the sriracha and cilantro. Stir to combine. You can add more hot sauce if you like. The quantity mentioned above was a perfect balance between the sweet peppers and tangy goat cheese. Cool slightly and then add the softened goat cheese. Combine. 


Preheat oven to 350F.

Wash the mini peppers and slice in half. Using a spoon, fill each half with the prepared bean mixture and place on a baking sheet lined with foil. Top each pepper with little cheese and bake for 8-10 minutes. Remove from pan, rest on sheet for a minute and then serve while still warm. 


These make for perfect finger foods, no utensils needed and the peppers are just right to hold the filling. They were gone in minutes! :D 


WOYP Day #32 Khara Bread and Khara Buns


Of late, I’ve been working on recipes that I had been meaning to tackle since years! Given that I’m not running around for the boys’ school or their activities, I’ve had considerably more time on hand or rather in one place. This of course doesn’t mean I can laze around since hungry bellies have become bottomless pits now :D I’m not complaining, I’m lucky I enjoy cooking and baking but its not the same story with many of my friends and relatives who want to be out of the kitchen asap! :)

This Khara bread has been on my list for not weeks or months but years! I finally got around to making it and definitely glad I did. I remember eating the pillowy soft Khara bread from bakeries back in Mysore. That and Toast, Honey Cake, Khara Biscuits, Benne Biscuits…yummmm! The driving force behind trying these recipes is the urge to eat them and their non-availability here! We crave those familiar flavors and smells, more so now being home all the time.
Khara means "spicy" in Kannada. 


This recipe makes one large loaf and few buns or a medium sized loaf and 6 buns. The recipe can be easily halved and is egg free. If you are making this for the first time I would highly recommend halving the recipe.

Khara Bread (or Buns): 
Makes: 2 medium loaves 


You will need:

3.5 cups to 4 cups All-purpose flour (Maida) plus more
2 tsp Active dry yeast
1 1/2 tbsp Sugar
1 tsp Salt
3/4 cup Water
1/2 cup Milk
2 tbsp Olive oil

For the flavoring:

1/2 cup finely chopped fresh Dill
1/4 cup finely chopped fresh Cilantro
1/2 cup finely chopped Onion (I used red onion)
1 tbsp Green chili paste ** (see note below)
1 tsp Cumin seeds
1 tbsp Olive oil or Vegetable oil

To brush the top of bread:

Milk as needed
Butter as needed

NOTE: I usually have a batch of green chili paste on hand, which has salt added to it (to preserve) since we use it in several south Indian recipes. I used the same quantity of this paste mentioned above but did NOT use the salt mentioned in the dough ingredients. If you make the green chili paste for this recipe then grind chilies to a fine paste and use salt as mentioned above. This is important because you don't want to over salt the bread.

Combine the water and milk and warm it (around 100F) on the stove top or a microwave. Add the sugar and yeast, stir and set aside for 10 minutes until frothy and bubbly. If you don’t see  any reaction either the liquid was not hot enough to activate the yeast or too hot to kill the yeast. In either case, you would have to start over. 

While the yeast proves, heat 1 tbsp of Olive oil in a pan. Add the cumin seeds and when it crackles, add the chopped onions and sauté until soft. Add the chopped dill and cilantro and saute for a minute until the dill loses the raw smell. Stir in the chili paste (see NOTE above). Turn off heat and cool.

Once the yeast is ready pour into the bowl of a stand mixer. If mixing by hand pour into a large bowl (enough to fit 4 cups of flour). Fit the dough hook on the mixer. Add the olive oil, salt (if using - see note regarding chili paste). Add 2 cups of flour and start the mixer on low. Add another 1.5 cups of flour and continue mixing until the dough comes together. It will be sticky. At this point add in the sautéed onion-greens mixture. Knead for a minute and then add more flour - I added about another 1/2 cup of flour until the dough came together into a soft smooth ball. Knead for 7-8 minutes. 


Transfer to a lightly oiled bowl and cover. Set aside in a warm place until doubled,  about 1.5 hours - 2 hours depending on how warm it is where you are.

Turn out onto a lightly floured surface and knead one more time by hand about 4-5 minutes. Cut dough in half, shape into a loaf and place in a greased 9”x5” loaf pan. Cut the remaining dough into 6 equal pieces and shape into buns. Place on a parchment lined baking sheet. Cover the loaf and buns loosely with a plastic wrap and allow to rise again for 40-45 minutes. 


Preheat oven to 360F close to the end of the second proof. Brush the top of the loaf and buns with milk.

Bake the buns for 15-16 minutes and the loaf for 25-28 minutes. Keep and eye on both and don’t allow the top to brown too much. Adjust baking times depending on the quantity you make and your oven.

Once the buns are out, brush the tops with melted butter. This makes for a soft crust. Do the same once the loaf is baked and out of the oven. Transfer to cooling racks and cool completely before slicing or storing.

This turned out to be a nice pleasant green on the inside with specks of dill everywhere. The taste is spot on and one bite with a slather of butter on a warm slice took me right back in time!! 


Blog Widget by LinkWithin